Tutorial for Training a Custom Pytorch Model for Mobile/Edge Optimized Deployment (Part 1)
Intro
Have you ever wondered about having your mobile phone providing helpful feedback about an activity that you are trying to learn? Like a personal coach or music teacher who’d tell you what you’re doing well (and not), so you can improve faster? But instead of researching for a suitable stranger to help you, wouldn’t it be great if you could experiment and learn on your own?
This was the genesis of this project, started out with the simple question:
“Could I train a AI/ML model for my phone to analyze my tennis practices and give me feedback to improve my game?”
I know enough about both topics to know that it should be technically possible, as well as what feedback that’d valuable for the tennis player. The biggest question at the time was, could this be done on device so the feedback would be immediate and private. That would be interesting and valuable to me.
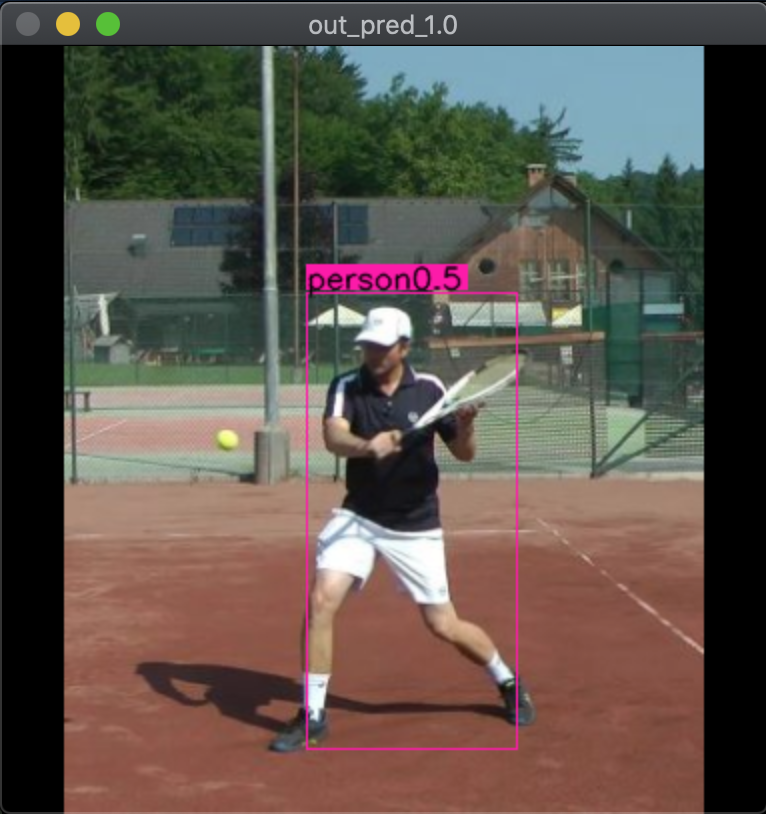
Not to give all of the ending away, but the answer to my question is yes. Here’s a preview of that app, running a custom-trained and optimized Pytorch model for analyzing live camera feed of tennis players, identifying the important events, and providing feedback in real-time to help the players improve.

Early prototype of the tennis app, tracking the objects, identifying the hits, and providing feedback via how well each hit is centered in the racket (score between 1 to 5).
The project has been super fun and equally challenging where I learned a ton, encompassing an end-to-end process of training the ML model and making it work on an iOS device. It’s a long and involved process so the project is broken down into parts to illustrate how you may tackle a similar project of your own. Be warned, though, that this is not an afternoon project, but a multi-week or months project.
Let’s get started.
Step 0: The Plan
At the onset of this project, we don’t know if it’d be feasible, but we could break down the technical requirements roughly as:
- Localize the player, racket, and tennis ball from the live camera feed
- Identify when the player hits the tennis ball
- Analyze the position of the tennis ball within the racket and provide a score of each hit
Seems reasonable, especially if someone is familiar with ML models like Yolo and OpenCV, running on desktop GPUs. However, the challenge I wanted to tackle is a custom model custom trained for this application, and to have everything run in real-time on device. There’s no beating the immediacy and convenience of using our smartphones as our personal coach.
Assuming you have not done an app like this before, there’s lots of question to ponder, including:
- What training data do we need?
- Where to get the training data?
- What model architecture(s) should we use?
- What model architecture is fast enough do live camera predictions?
- Should tried-and-true architectures be used, or some latest SOTA ones?
- Which model architecture(s) would be accurate enough for our use case?
- Which model architecture(s) would convert correctly to Core ML?
- Even if a model can be converted, how about its pre- and post-processing steps?
- How much training data do we need to get to sufficient accuracy?
- Would the accurate model be efficient enough to not drain the battery in 15 minutes?
- If accuracy is an issue, is it mostly due to model architectures or training data, or both?
- If we need to add more training data, how would we go about that?
- Wait, we are going to do live video understanding on an iPhone? Is that even possible?
The list goes on and can get overwhelming quickly. We will address most of them in this series, and here’s are some do’s and don’t’s before we get started:
- Yes, it’s possible to do live video understanding on iPhones with sufficient engineering
- Do break the project down and start simple
- Don’t start from scratch unless you have done this before
- Do give yourself plenty of time to train and refine the models
- Don’t assume something will work just because you read it on the internet :)
Step 1: Break the Problem Down
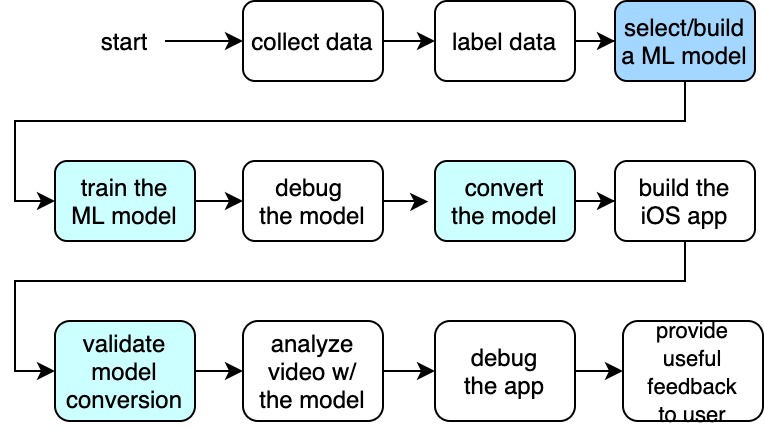
If we follow the linear progression of this app’s development, the process may look something like this:
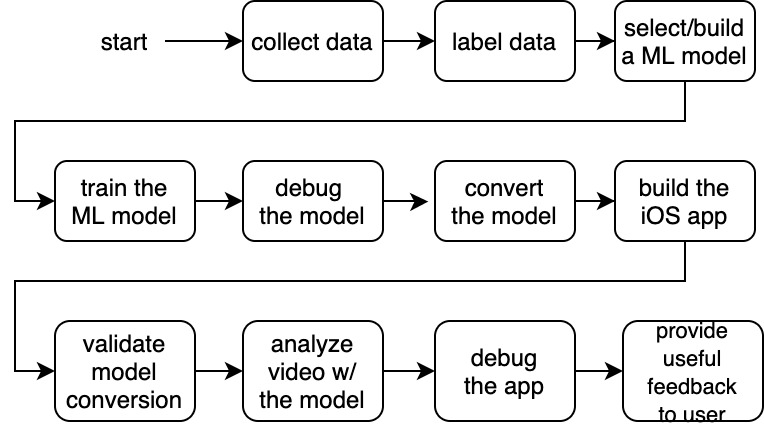
Overview of the end-to-end steps involved.
However, if this is carried out sequentially in time, the process may take months, if not years, especially if we run into problems along the way and have to reset to earlier steps, and even to the very beginning and collect more data. A very frustrating experience this approach would make. Do not go with this approach!
Instead, let’s break the project down into phases, into minimally validate-able prototypes. These are the ones I used for this project:
- A model architectures that can be trained to localize the three object classes we need
- Check the model architecture can be converted and run fast enough on iOS devices
- Check that the model can get accuracy enough for our use case
- Build an iOS app that can turn the model’s outputs into useful feedback for the tennis player
Then for each of these phases, we identify the minimal dependencies needed for each.
For phase 1, the breakdown would be:
- choose the model architecture(s) for object detection
- check that we can readily train these model choices
For 2, this would be:
- convert the trained ML model with Core ML
- validate the model predicts the correct outputs
- benchmark the inference speed on device
For 3, this involves:
- collect training data for our tennis use case
- label the dataset
- train the model with this dataset
- validate whether the accuracy is sufficient for our use case
- debug/refine the model as needed
For 4, the final stretch:
- run prediction on video stream via the trained model
- convert the data points per useful events into feedback for the tennis player
The goal is to have a functional end-to-end pipeline from the start and throughout the project, and layer on the complexity between phases. For the scope of this post, we will actually cover both 1 and 2, since we have largely covered phase 2 in my previous posts. If you haven’t read them, it’s a good idea to give them a scan if you get stuck with Core ML conversions.
Step 2: Choose a Suitable Model Architecture
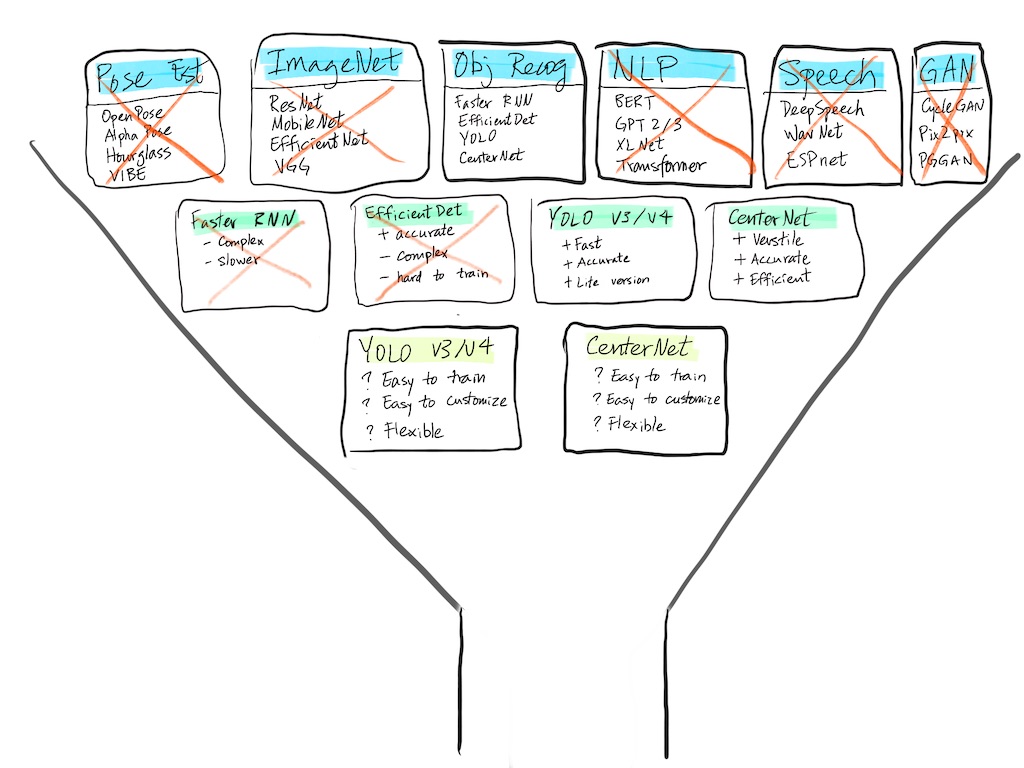
Our first task is to select a suitable model architecture for our use case. For those who are familiar with customer acquisition and sales, this process is similar to those funnels, where the top of the funnel quite wide, and through phases of qualifications, we narrow down the field and hone in. Here’s a crude visualization of the top of our “model funnel:”
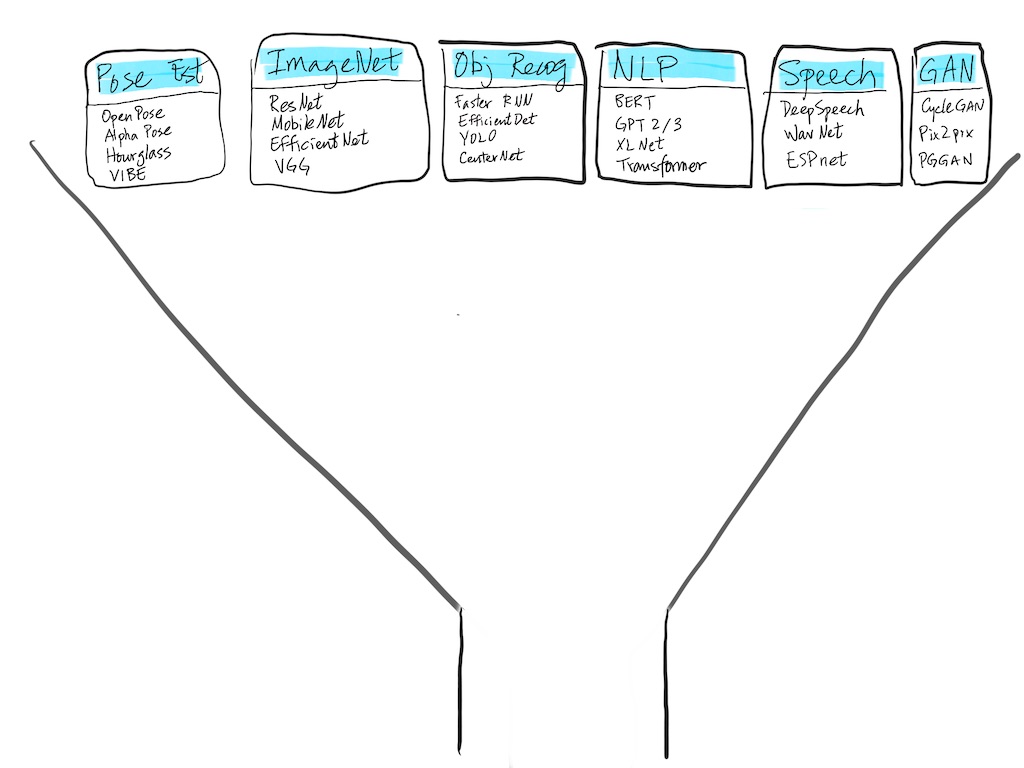
Top of the model funnel with lots of approaches and models to choose from.
The first step is to match the use case into a class of ML problems. Unfortunately there isn’t a definitive guide for this, and if you are unfamiliar with ML, I’d look for models or apps that already do something very close to what you need and start there.
For this use case, we can quickly narrow down to a class of models for object detection, include Faster R-CNN, Single Shot Detector, and YOLO models. Even with the class narrowed down, the number of model choices is daunting.
My recommendation here is to start with the smallest and simplest model we can get our hands on. We’d need a model to localize the player, racket, and ball. Our next task is to find a suitable implementation that is easy to train. This last point is more subtle, but watch out for models that may be tricky or take a long time to train, need tricks during training, or involve complex augmentation procedures. They’d increase the time and uncertainty to get things working end to end. Best to start simple.
Step 3: Take a Chance on Me…
At the core of this app is a model for both detecting and localizing three classes of moving objects within videos: persons, rackets, and tennis balls. As luck with have it, all three of these objects are part of COCO, meaning there are training data labeled with the locations of one of these objects. Here’s one example:
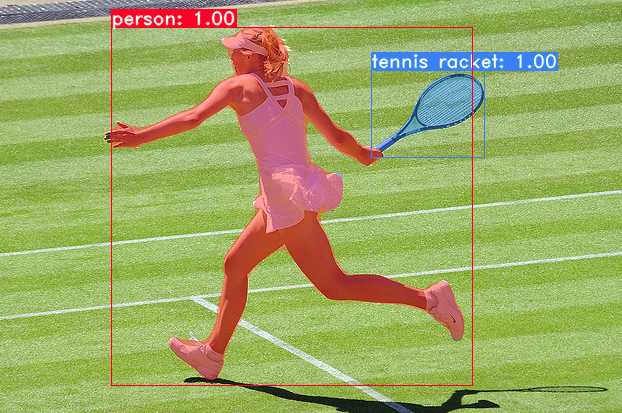
Example image from COCO.
This is great because we could potentially use one of state-of-the-art object detection models to analyze our videos. The challenge is to find one that satisfy the following objectives:
- Fast enough for on device predictions
- Accurate enough for our use case
- Flexible and fast enough to train
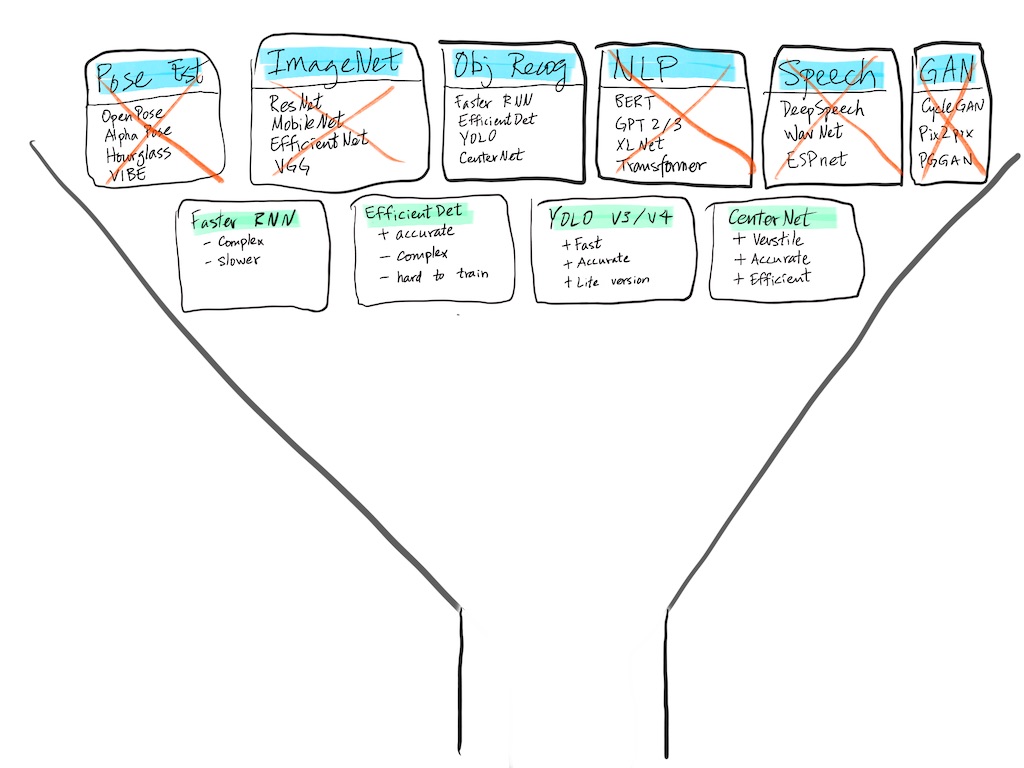
Second step of the funnel: Examining the possible object detection models.
The first objective can be approximated by the number of parameters in the model, or by the number of Multiply-Add operations for a single image. A very ballpark figure would be to stay under 5M parameters, but to be certain it’d better to go with a known architecture like MobileNetV2 or convert the model and benchmark it on a device. If we want real-time performance at 30 frames per second, each forward pass should take less than 33ms, ideally much less since there are other overhead and power concerns. Hollance has a great blog post on benchmarking various mobile architectures on different Apple hardware.
The second objective we’d not really know until we train the model on tennis data. It’s tempting to start with the most accurate model, like EfficientDet-D7, and apply it to our use case. However, unless you have had experience with successfully training a particular architecture, I would recommend against starting with the latest and greatest. It’s a much better strategy to start with a well-used architecture, get a prototype functional, and then move up the accuracy ladder if that’s where the shortfall turns out to be.
For the third objective, it’s about how quickly a model can be trained as we modify and experiment with changes to our model and training strategy. Ideally it’s on the order of a few hours, or within a day’s time so you can start a training run at the end of one day and check the result the next. Having a short feedback loop, especially in the earlier phase of the project, is crucial to get the project off the ground. This is another reason I prefer working with mobile-friendly models: they are faster to train and faster to iterate on.
Based on these criteria, and looking down the COCO leaderboard, EfficientDet and its variants have known to be tricky to train, so skipping past them, YOLO v4 (and possibly v5) are good candidates. Below that is CenterNet, which has good properties for being anchor-free (meaning based on keypoints) and flexible in its applications, including object detection, pose estimation, and even 3D localization. It’s simple to train, and has a flexible backbone for balancing between accuracy and efficiency. Therefore, this is the model architecture I went with, but that’s an implementation detail. The more important is the process of choosing good candidate models and validating them as quickly as possible.
Step 4: Getting to Know You..
We have now narrowed the field from all ML models to object detection models, then to COCO models, down to last two model candidates.
Third step of the funnel: Comparing our top two model candidates.
CenterNet represents objects as a set of points, rather than bounding boxes. Specifically, it models objects via a center point, similarly to keypoints like facial or joint landmarks. Additionally, every object has a width and height component from its center to define the object’s extent in 2D space, or 3D if depth is added. The following figure illustrate this simple and elegant representation:
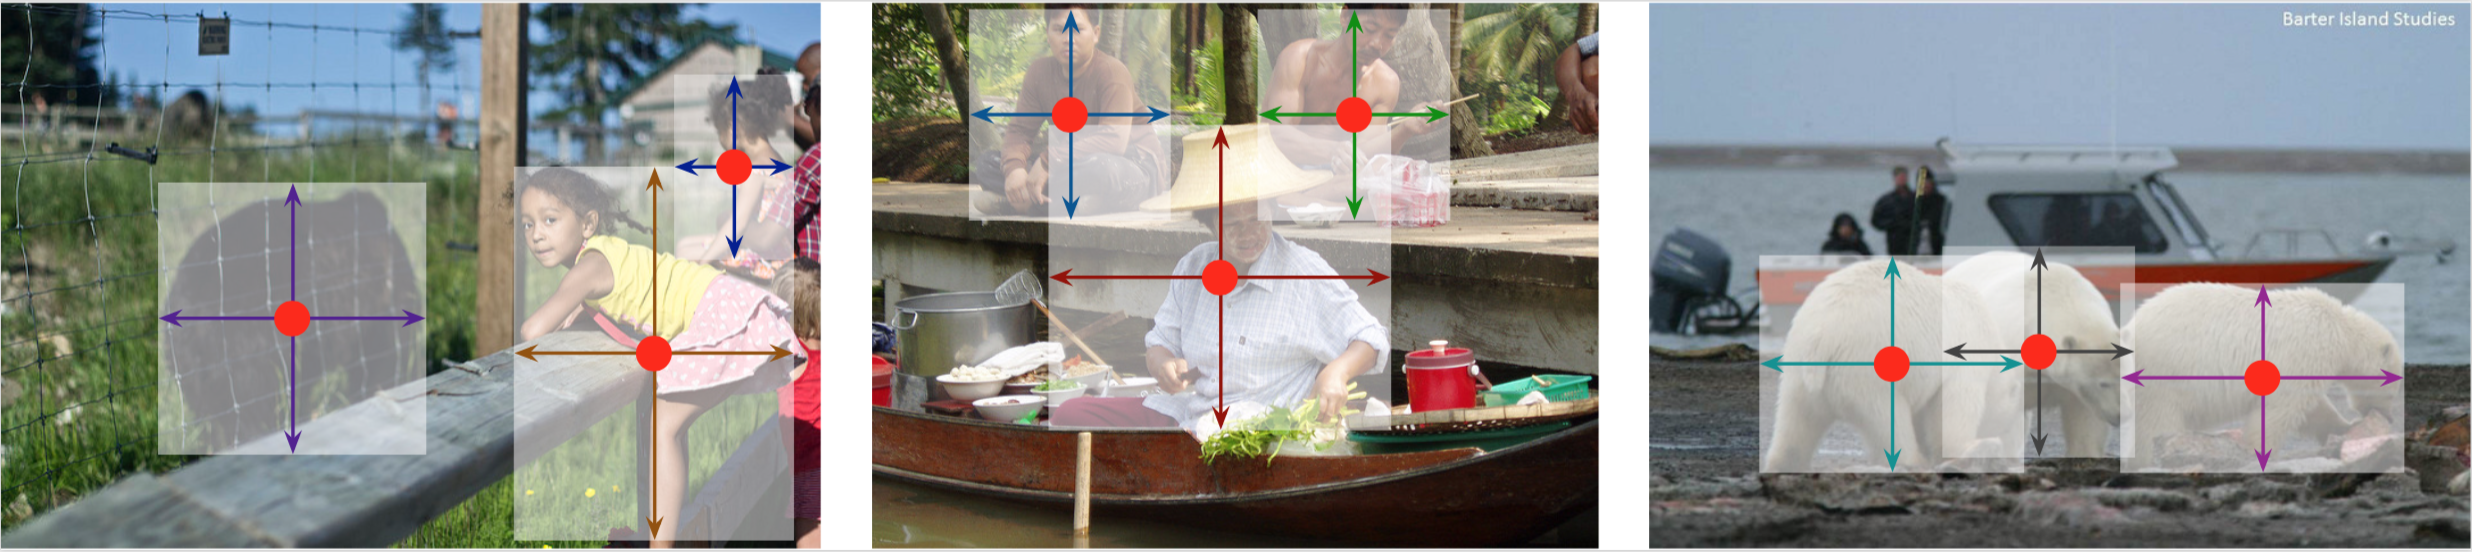
Figure from the "Objects as Points" paper.
In our tennis use case, this model could be as simple as tracking three centers: the player, racket, and tennis ball. The centers are paired with their widths and heights to express the 3 objects we’d like to localize and track their motions. Here’s an illustration of how CenterNet would represent the detections:
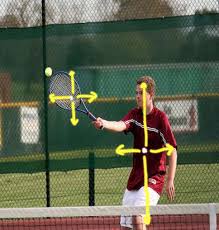
Illustration of centernet points for our three object types. (image credit)
If we get a model to work for this simple scenario, we have the flexibility to add more keypoints for the model to learn and track, such as body joints, racket head, neck, etc., for more granular analysis. For now, we will focus on the base case of 3 keypoints.
For the implementation of this architecture, the official Pytorch repository is well organized and well documented, including scripts to train on the COCO dataset from scratch. The minor downside is the repo is more complex since it supports other tasks such as pose estimation and 3D localization, which we don’t need (yet at least :) ). Fortunately, due to this approach’s popularity, there are multiple implementations, including this “simple” version that only does object detection, with up to mAP of 45.3 for COCO, which is quite competitive with the SOTA model EfficientDet-D3. Granted that these results are not useful for mobile applications, but it’s a good relative comparision between these architectures. Our next task is to validate whether we can build upon this implementation of CenterNet for our project.
Step 5: Train a Stock Model (the litmus test)
Before we can be sure that CenterNet will be the model to go with, we must check that there’s an implementation that we can work with. If yes, great. If not, switch and try the backup candidate. Not a big loss; better to find out now than later.
Last step of the funnel: Trust but verify -- proof is in the doing.
If you have not trained a deep learning model, here’s a great opportunity to start. Once you get over the mechanical details (OS, CUDA, dependencies, etc.), the training process itself is very straight forward, and thus the appeal of Pytorch (and other training frameworks).
Since this post is not about how to set up a ML training environment, I will assume you are able to get Pytorch with GPU support set up, most likely in a Linux environment on a dev box, in the cloud, or possibly Google Colab (although I didn’t test the last one for this project.) My local setup is a Linux box running Ubuntu 16.04 with one NVIDIA 1080Ti, a pretty affordable rig for ML experimentation.
Once your Pytorch environment is set up (the Linux one, not macOS), clone the repo for the Python portion of this project and follow the steps to ready the project for training:
git clone https://github.com/ml-illustrated/Tennis-CenterNet-Pytorch-starter

# create virtualenv
virtualenv -p python3.6 ~/.virtualenvs/tennis-centernet
source ~/.virtualenvs/tennis-centernet/bin/activate

# install requirements
pip install -r requirements.txt
Now follow the steps from the project’s README:
# set up cocoapi
cd Tennis-CenterNet-Pytorch-starter

cd lib/cocoapi/PythonAPI
make
python setup.py install
cd -

# OPTIONAL: Compile deformable convolutional layer (torch version 1.3.1 or older)
# it's ok if this doesn't compile since we won't use this layer in our model
cd lib/DCNv2
bash make.sh
cd -

# Compile NMS
cd lib/nms
make
cd -
With these packages installed, we need to get some training data to test out the training environment. Since we are sanity-checking this, we will use as small of a dataset as possible, in this case Pascal VOC. For this, follow step 7 of the README to download VOC 2012 with annotations in COCO format (and not the original VOC).
Once you unzip the dataset, your data directory should look like the following:
data/voc/
├── annotations
│   ├── pascal_test2007.json
│   ├── pascal_train2007.json
│   ├── pascal_train2012.json
│   ├── pascal_trainval0712.json
│   ├── pascal_val2007.json
│   └── pascal_val2012.json
├── images
│   ├── 000001.jpg
│   ├── 000002.jpg
...
Now we are ready to train! We will train the smaller model (18 layer ResNet with deformable convolutions) so it will complete as quickly as possible, using the hyperparameters the original author recommended:
python train.py --log_name pascal_resdcn18_384_dp \
                --dataset pascal \
                --arch resdcn_18 \
                --img_size 384 \
                --lr 1.25e-4 \
                --lr_step 45,60 \
                --batch_size 32 \
                --num_epochs 70 \
                --num_workers 10
If everything goes well, you will see the training progress printed out, mainly of the losses of the three set of outputs (heatmap, regression, and width_height):
Setting up data...
Creating model...
Starting training...

 Epoch: 1
[1/35-0/285]  hmap_loss= 78.69695 reg_loss= 0.49154 w_h_loss= 29.72694 (788 samples/sec)
[1/35-100/285]  hmap_loss= 5.78735 reg_loss= 0.23640 w_h_loss= 28.96945 (87 samples/sec)
[1/35-200/285]  hmap_loss= 4.01353 reg_loss= 0.22598 w_h_loss= 29.16429 (86 samples/sec)

 Epoch: 2
[2/35-0/285]  hmap_loss= 3.49526 reg_loss= 0.25901 w_h_loss= 13.58479 (1466 samples/sec)
[2/35-100/285]  hmap_loss= 3.48333 reg_loss= 0.25582 w_h_loss= 11.46676 (85 samples/sec)
[2/35-200/285]  hmap_loss= 3.24749 reg_loss= 0.25073 w_h_loss= 9.61131 (85 samples/sec)

...
Once the model trains a few epochs, you can cancel the training since we cannot use this model due to the DCN layer. Instead, we will train a DCN-free version of ResNet-18.
Step 6: Trimming the Stock Model
The original repo contained a dormant implementation of ResNets, which is now
made available as an architecture to train with in our repo. Little has to change other than
specifying this model to the train.py script and train on the same VOC dataset.
If we wanted to, we could train both ResNet-18 and ResDCN-18 the same number of
epochs and see how their accuracy compare side-by-side. For our case, we only
want to check that ResNet can be trained for 35 epochs and exported to iOS
for validation.
python train.py --log_name pascal_resnet18_384_dp \
                --dataset pascal \
                --arch resnet_18 \
                --img_size 384 \
                --lr 1.25e-4 \
                --lr_step 25,30 \
                --batch_size 58 \
                --num_epochs 35 \
                --num_workers 10
This model trained to ~62.85% accurate for VOC with pretty high loss still, but that’s ok since it’d be sufficient as a sanity check that the training process works:
...
Epoch: 35
[35/35-0/285]  hmap_loss= 1.45281 reg_loss= 0.22227 w_h_loss= 2.18971 (1497 samples/sec)
[35/35-100/285]  hmap_loss= 1.50786 reg_loss= 0.23804 w_h_loss= 2.55130 (96 samples/sec)
[35/35-200/285]  hmap_loss= 1.65311 reg_loss= 0.23493 w_h_loss= 2.89664 (96 samples/sec)

Val@Epoch: 35
(0.6285142836637798, ...)
How do we know if the model is indeed detecting the objects classes within VOC
correctly? The losses and validation accuracies are good indicators, but nothing
beats visualizing the detections on test inputs. For this I added a demo.py
script to run a test image through a trained model and visualize the
detected objects:
python scripts/demo.py --fn_image drop-shot.jpg \
                       --arch resnet_18
                       --model_path ckpt/pascal_resnet18_384_dp/checkpoint.t7 \
                       --test_topk 1
And even with a model that’s not highly accurate, it is able to detect my favorite coach here. Nice, that’s assurance that this model can be trained from scratch!
Coach Tomaz of Feel Tennis teaching the proper drop shot technique.
Step 7: Export the Pytorch model to ONNX
Before we can declare success, the model needs to be exportable to Core ML. If you have been to this blog before, you’d know the trials and tribulations this may involve. The sooner we can validate this, the better.
Skipping the details, the gist of the process is to instantiate the model, load the checkpoint, and export the model first to ONNX format using a test image:
# load model architecture
model, _ = load_network_arch( cfg.arch, ...)
# load checkpoint
model = load_model(model, cfg.model_path, ...)
model.eval()

# load test image
img_batch = load_test_img_batch( cfg.img_size, batch_size=1 )
model_inputs = torch.from_numpy( img_batch )

input_names = ["input.1"]
output_names = [ 'output_hmap', 'output_regs', 'output_w_h_']

# export to ONNX format
torch.onnx.export(
    model,
    model_inputs,
    cfg.output_name,
    input_names=input_names,
    output_names=output_names,
    operator_export_type=OperatorExportTypes.ONNX
)
Run this export script by passing in the parameters of our just-trained ResNet 18 model, and it runs without a hitch:
$ python scripts/export_onnx.py --arch resnet_18 \
                              --img_size 384 \
                              --model_path ckpt/pascal_resnet18_384_dp/checkpoint.t7
                              --num_classes 20
                              --output_name /tmp/resnet_hc64.onnx
loaded pretrained weights form ckpt/pascal_resnet18_384_dp/checkpoint.t7 !
Step 8: Convert the Model with Core ML
The next step is converting from ONNX to Core ML, via a second convert_coreml.py
script. There’s more going on in this script, mainly to set up the image
pre-processing steps that was done with Pytorch/PIL. Since we don’t have access
to those libraries in Core ML, we’d have to use Core ML’s convention of
preprocessing_args for normalizing the color channels to between 0 and 1.
# load the mean and deviation from the VOC dataset
from datasets.pascal import VOC_MEAN, VOC_STD

# convert the parameters to Core ML convention
inv_std = 1 / np.mean( VOC_STD )
red_bias, green_bias, blue_bias = (
    -VOC_MEAN[0]*inv_std,
    -VOC_MEAN[1]*inv_std,
    -VOC_MEAN[2]*inv_std
)
image_scale = inv_std / 255.0
image_scale = 1.0 / (255.0 * 0.226)

onnx_model = load_onnx_model( fn_onnx )
# convert the model
mlmodel = onnx_coreml.convert(
     onnx_model,
     predicted_feature_name = [],
     minimum_ios_deployment_target='13',
     image_input_names =  ['input.1' ],
     'red_bias': red_bias,
     'green_bias': green_bias,
     'blue_bias': blue_bias,
     'image_scale': image_scale,
)
Now convert the ResNet 18 from ONNX to Core ML and it’s smooth sailing. Nice!
$ python scripts/convert_coreml.py 'resnet' 'hc64'
1/84: Converting Node Type Conv
2/84: Converting Node Type BatchNormalization
...
83/84: Converting Node Type Relu
84/84: Converting Node Type Conv
Translation to CoreML spec completed. Now compiling the CoreML model.
Model Compilation done.
We can check the converted .mlmodel in Netron and double check
that the inputs and outputs are exported correctly.
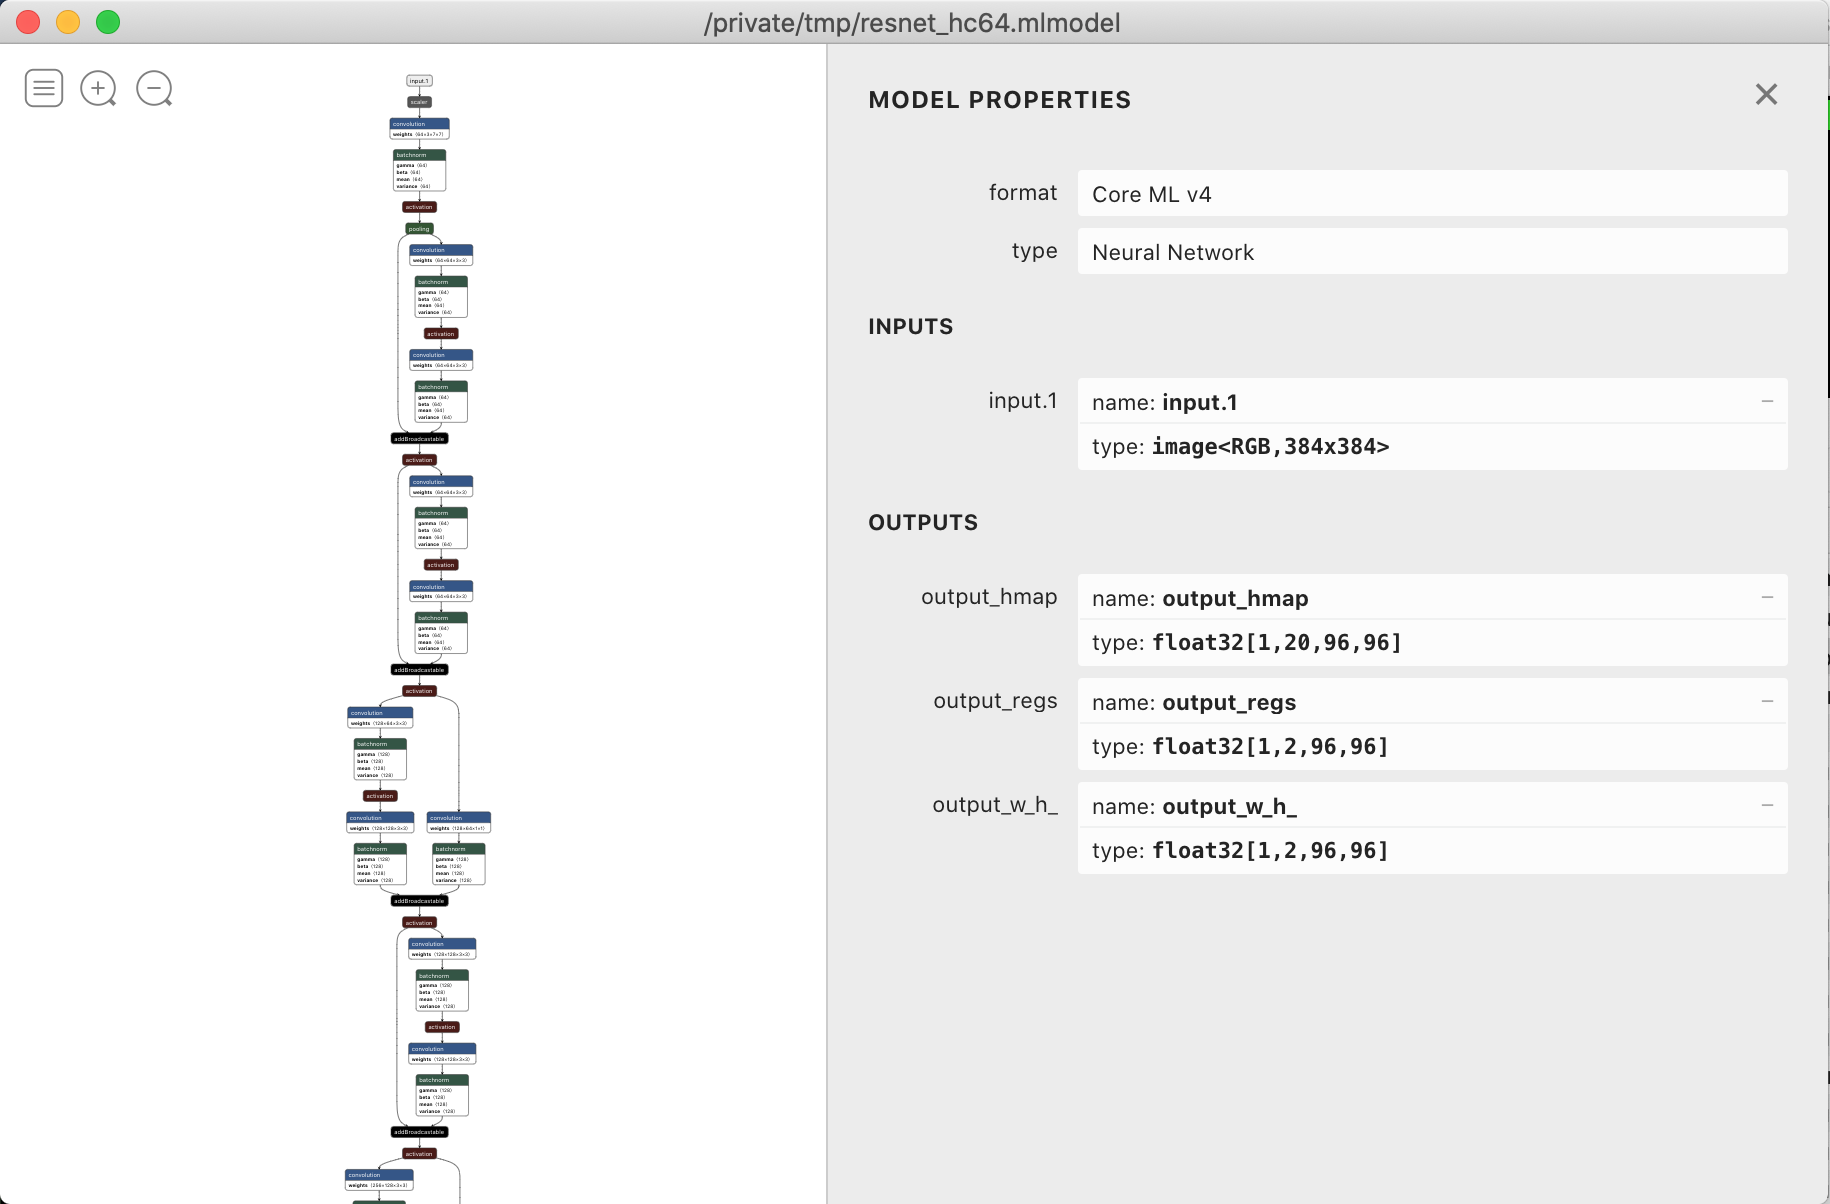
Double checking our model conversion with Netron.
Step 9: Verify the Converted Model with XCTests
As with our previous conversion process, we capture the model outputs of the
Pytorch model given a test image, save as a JSON file, and import them into
Xcode project, alongside the .mlmodel file. We then create a XCTest to run
predict on the same image and verify the model predictions from iOS are
the same as Pytorch to be certain that the model will behave the same way
as trained.
This has been set up in an example Xcode repo already, so you can clone it to
get started. You do need to drag the .mlmodel into the main
project and select both targets for running the tests.
git clone https://github.com/ml-illustrated/CoreML-CenterNet-Tennis-starter
Select the file CoreML_CenterNet_Tennis_starterTests.swift file and run
the test_model() test. It runs the end-to-end prediction test using the
same test image in Pytorch and compares the heatmap for the person class.
The gist of the test file is:
// load the model
let model = resnet_hc64()

// load the test image
let test_image : UIImage? = try? load_image(name: "drop-shot.384", type: "jpg")
let featureValue: MLFeatureValue = try MLFeatureValue(cgImage: test_image!.cgImage!)

// run predict
if let provider = try? MLDictionaryFeatureProvider(dictionary: inputs),
    let outFeatures = try? model.model.prediction(from: provider) {
    let result = resnet_hc64Output(features: outFeatures)
    let output_hmap: MLMultiArray = result.output_hmap

    // compare the heatmpas
    for i in 0..<expected_hmap.count {
       let spec_row = expected_hmap[i] as [NSNumber]

       for j in 0..<spec_row.count {
           // ... compare the heatmap values
       }
    }
}
If the values of our 96x96 heatmap from Core ML model is nearly the same as the one from Pytorch, we can then be much more confident that this model could work for our project. There are too many reasons why this converted model may not work, including padding, upsample layers, and others. Because of this, I always run this end-to-end (train from scratch to predict in Xcode) process before investing any more time into a new model architecture. In this case, you should see a successful run of the final step like the following:
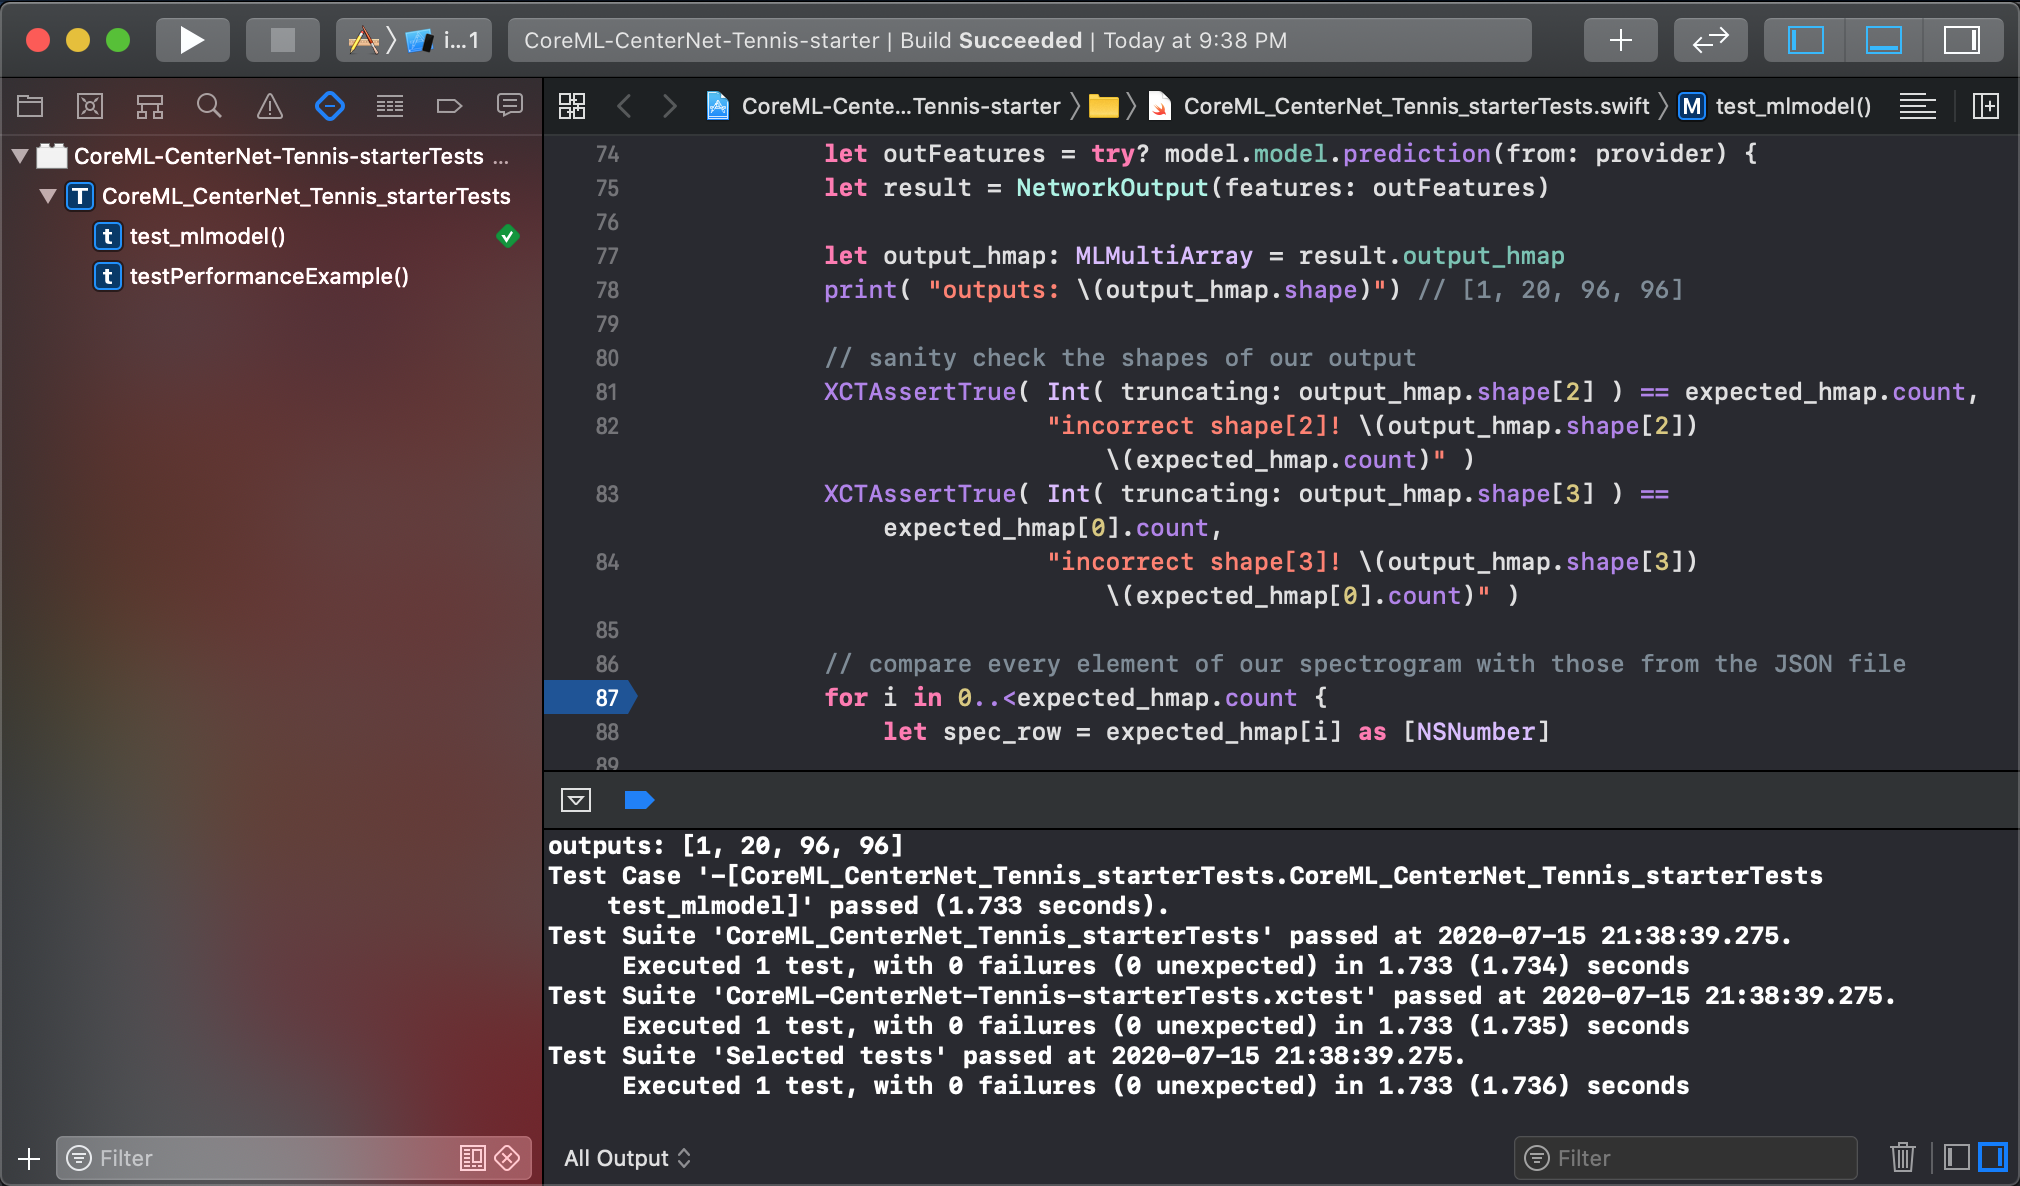
Happiness is tests passing.
Step 10: Bonus: Train a Model Variant
This is great news that the ResNet 18 architecture converted successfully. However, this model might be too large for on device inference of videos, so we best to check whether this backbone can be replaced with a mobile-friendly one instead.
Although this CenterNet implementation doesn’t include MobileNet V2, it’s not
too much work to replicate ResNet 18 and replace its “features” layers with
ones from MobileNet V2. Effectively, the network has 3 sections: feature backbone,
upscale (deconv), and 3 heads, as seen in the forward() method:
def forward(self, x):
    # the MobileNetV2 trunk
    x = self.features(x)

    # decovolution/upsample layers
    x = self.deconv_layers(x)

    # the three heads for generating the outputs
    out = [self.hmap(x), self.regs(x), self.w_h_(x)]

    return out
The details are in the code nets/mobilenetv2.py if you want to see how
it was done. We can now train this variant using the same VOC data set as before, with 35 epochs:
python train.py --log_name pascal_mobilenetv2_384_dp \
                --dataset pascal \
                --arch mobilenetv2 \
                --img_size 384 \
                --lr 1.25e-4 \
                --lr_step 25,30 \
                --batch_size 50 \
                --num_epochs 35 \
                --num_workers 5

Creating model...
Starting training...

 Epoch: 1
...
 Epoch: 35
[35/35-0/331]  hmap_loss= 1.78764 reg_loss= 0.23410 w_h_loss= 2.72044 (2068 samples/sec)
[35/35-100/331]  hmap_loss= 1.89861 reg_loss= 0.24017 w_h_loss= 4.07975 (98 samples/sec)
...
 Val@Epoch: 35
(0.539037953173551, ...)
This model will train to ~53.9% average precision, which is expected to be lower than ResNet’s ~62.9% since it’s a much smaller model. To know how “big” the model is, there are multiple ways. A crude way is simply the size of the checkpoint file: ResNet weighs in at ~60M, while MobileNetV2 is at ~16M.
A better way is via packages like
torchsummary,
which will report the the number of trainable parameters (among other features).
For MobileNetV2 it reports 2,411,527, whereas ResNet18 is 15,820,372.
These two sets of metrics allow us to plot the tradeoff between size and accuracy,
in a way provide the ceilings and floors of the performance envelope we are
going to work within. We now have a choice to work from the small model and
work to improve the accuracy, or start with the the big model and reduce its
size. We will explore those two options in the next part as we move onto
customizing this model to our use case.
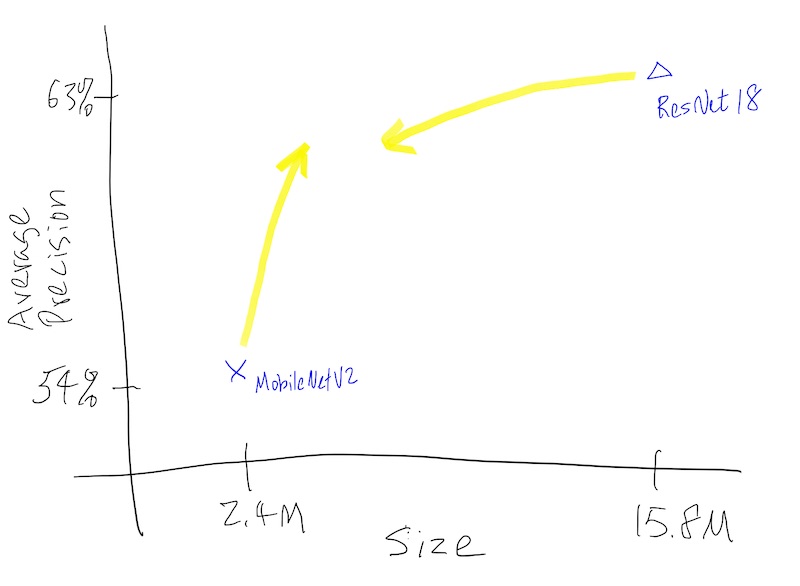
Conceptual plan on how to optimize our model.
Conclusion
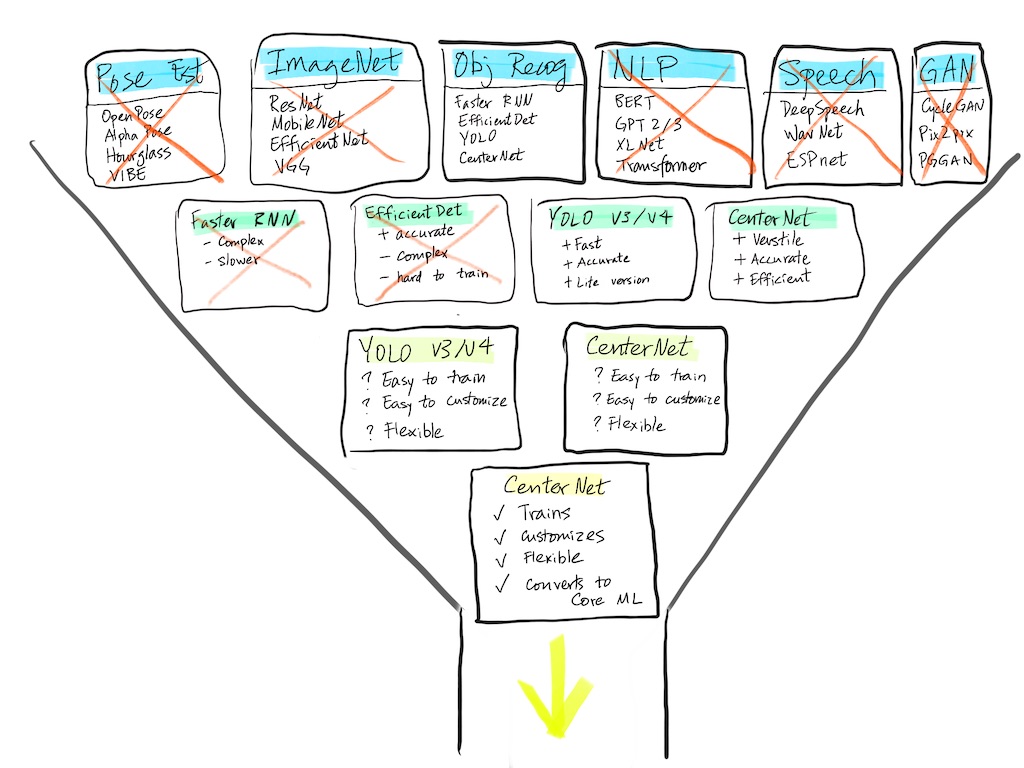
That was quite an involved process! Still, we have made great progress and hit our goals we laid out at the start. Let’s take a look at the steps we accomplished so far:
Progress report at the end of part 1.
We covered how to start with a use case, break down the problem, and choose a model architecture we want to start with. The immediate next step is to verify that we can indeed train it, convert it, and validate it on our target deployment environment, with XCTests on iOS in this case. Once we are confident that this model will work for the “out of the box” scenario, we can then start modifying it for our tennis use case. Even better, we now have the upper and lower bounds of the accuracy/performance tradeoff we want to work within.
Now with this foundation in place, we can start layer in our customizations and refinements onto the whole process, including model changes, custom dataset, training regime and hyperparameter tuning, etc., all the while having these safeguards in place. It’s a much more grounded approach to start this way, simple and fast at first, then add complexity.
In the next part of this series, we will start our training process in earnest!