How to Deploy A State-of-the-art PyTorch Model to iOS via Core ML (Part 3)
Intro
Preface: As I was preparing this post, at WWDC Apple released their updated
version 4 of coremltools, which has
a much welcomed support for Pytorch models! Upon quick inspection, there
are a few things to keep in mind:
- Version 4 supports Pytorch >= 1.4.*
- Version 4 supports iOS >= 13 and macOS >= 10.14
- It’s a fresh release and operator support is a work in progress still
If the above requirements do not pose limitations for your situation, by all means, give version 4 a try and see how your model converts. For whatever reason version 4 doesn’t work out, this post covers version 3 and the challenges you may encounter along the way.
In this post, I’ll walk though the process of starting with a SOTA sound classification model trained using Pytorch, attempting to convert it to Core ML, working through the various issues, to ultimately having it run sound classification on iOS via accelerated silicon.
The end result with model running on device, literally "in the wild" classifying sounds in nature.
The process wasn’t pretty and I came close to giving up on multiple occasions, but I hope this tutorial may help you work through your model conversion issues and get some SOTA hotness running within your iOS apps. Once you become familiar with resolving them, you will have much greater freedom to incorporate the latest advancements in ML research into upgrading and exploring new use cases for your apps (instead of waiting around and hoping for someone to make them available). With version 4, this process should accelerate even more, which is exciting.
As a note, this post builds upon the models and processes from part 1 and part 2 of this series on how to deploy Pytorch models on iOS via Core ML, so if you haven’t read them, it’d b very helpful to give them a quick scan so you can pick up where we left off.
Let’s get started.
Step 0: The Plan
As explained in part 1 and 2, the conversion pipeline (with version 3) consists of Pytorch model -> ONNX model -> Core ML model -> Swift inference -> Swift visualization, ideally with tests between each of the steps. In this post, we will focus mostly on the Core ML step, since the rest is largely covered in part 1 and 2.
Same preliminaries as part 1 and 2, you will need Xcode 11.3+ and therefore MacOS Mojave
or Catalina. To get set up, clone
the project’s repo
(be sure to add the --recursive flag), create a virtualenv,
and install the requirements:
git clone --resursive https://github.com/ml-illustrated/Pytorch-CoreML-Sound-Classification
cd Pytorch-CoreML-Sound-Classification/python

python -m virtualenv ~/.virtualenvs/coreml_sound
source ~/.virtualenvs/coreml_sound/bin/activate

pip install -r requirements.txt
Step 1: Get to Know the Model
Before starting any model conversion, it’s always good to
take a look at the model’s architecture in Pytorch,
mainly of its forward method and the layers it calls. The more
clean and easy to understand this part of the model is, the smoother
the conversion process will likely be.
For this tutorial, our sound classification model is an impressive research into what model architectures and training regimes to achieve the most accurate classification of input sound waves into the 500 or so sound classes within the AudioSet dataset. It is geared towards as a VGGish replacement, not only in its much improved accuracy, but also efficiency and flexibility. This model, named PANN, has a choice of backbones, one of them being MobileNet V1 and V2, making them suitable for mobile and edge devices. It’s an ideal foundation to build apps with sound classification and event detection.
You don’t have to have a research background to read the paper, since since they often have good summaries and comparisons between architectures and approaches, not to mention accuracy results.
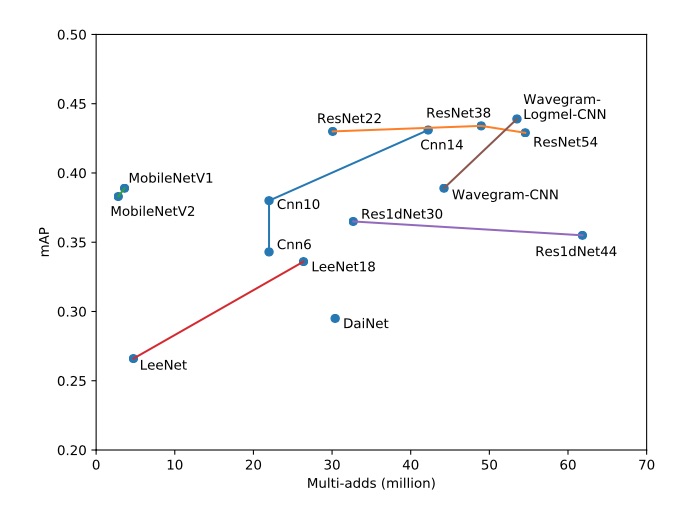
Figure 4 from the Kong et al. paper comparing the tradeoff of architecture complexity with accuracy. Ideal would be towards the top left corner.
We’d have to decide on which backbone architecture for our mobile application, and one that’d be least troublesome for Core ML. There’s no set rules for this, but a reasonable rule of thumb is going with a architecture to has already been converted to Core ML, by checking the official models from Apple. In our case, we choose MobileNet V1 since its accuracy is a bit higher than V2.
We can see the implementation of this model in the source file models.py
under python/audioset_tagging_cnn/pytorch/, and jump to the forward
method of the model class MobileNetV1
around line 1398.
This inferencing part of the model can be broken down into three main sections:
- Audio preprocessing (lines 1402 to 1403)
- Backbone for feature extraction (line 1416)
- Feature classification (the rest)
The first section is the mel-spectrogram layers we already converted in part 1&2 of this series, and the backbone is a tried-and-true network, which leaves us with the third section, the feature classifier that’s made up mostly of convolution and linear layers, so our chances are good that they would be supported by Core ML. Let’s find out.
Step 2: Load the Pre-trained Model and Export to ONNX
Now we have picked the pre-trained model to convert, the next step is to instantiate it and then load the weights. Before you begin, I’d start with creating a new class that subclasses the original, since more often than not, we’d need to make modifications for successful conversion. This way we can preserve the original and not inadvertently introduce some bugs, only to then waste time trying to figure out why the accuracy took a hit later on.
For the PANN model, the process is to simply subclass the MobileNetV1 model
into MobileNetV1Export,
add an export_onnx method, and see how it goes. Later in this tutorial, we’d
add a bit more pizazz to our model, the modifications of which would be applied to
this subclass and not the original.
Let’s start simple by creating the model subclass, adding a couple of properties we’d use in exporting the model, namely the input and output names:
from audioset_tagging_cnn.models import MobileNetV1

class MobileNetV1Export(MobileNetV1):
    def __init__(self, *args, **kwargs):
        super(MobileNetV1Export, self).__init__(*args, **kwargs)

        self.input_name = 'input.1'
        self.output_names = ['clip_output', 'frame_output', 'melspec' ]
We then add the new method for exporting to ONNX via a sample wav file, which if you recall from earlier posts, will be used across the conversion process to validate the converted model(s):
  def convert_to_onnx( self, filename_onnx, sample_input ):
    torch.onnx.export(
        self,
        torch.from_numpy( sample_input ),
        filename_onnx,
        verbose = True,
    )
Now we are ready to instantiate this model, which may or may not be simple. More likely than not, research models are geared toward flexibility by providing a ton of hyperparameters to experiment with. That’s usually the opposite of a production model where we need to lock in the particular variant we want use, by hardcoding these hyperparameters tied to the pre-trained model:
def export_model( checkpoint_path, sample_input ):

    model_args = {
      'sample_rate': 32000,
      'window_size': 1024,
      'hop_size': 320,
      'mel_bins': 64,
      'fmin': 50,
      'fmax': 14000,
      'classes_num': 527
    }
    model = MobileNetV1Export(**model_args)

    checkpoint = torch.load(checkpoint_path, map_location='cpu')
    model.load_state_dict(checkpoint['model'])
    model.eval()

    filename_onnx = '/tmp/PANN_model.onnx'
    model.convert_to_onnx( filename_onnx, sample_input )
Now run this script using the downloaded pre-trained model and a sample wav file:
$ python export.py MobileNetV1_mAP=0.389.pth R9_ZSCveAHg_7s.wav

graph(%input.1 : Float(1, 12800),
      %spectrogram_extractor.stft.conv_real.weight : Float(513, 1, 1024),
      %spectrogram_extractor.stft.conv_imag.weight : Float(513, 1, 1024),
      %logmel_extractor.melW : Float(513, 64),
      %bn0.weight : Float(64),
      ...)
And ONNX converted it without errors. Nice! Let’s use Netron to check out the model, which is certainly more complex than the mel-spectrogram (part 2) model:
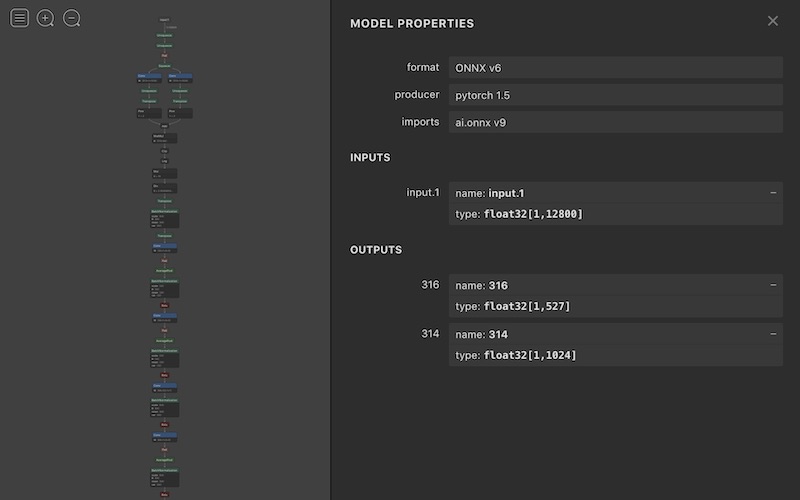
Visualizing the top portion of the ONNX model with Netron.
Step 3: Convert from ONNX to Core ML
Let’s now add the Core ML conversion step and see what happens:
def export_model( checkpoint_path, sample_input ):

    ...
    # do Core ML convert
    mlmodel = onnx_coreml.convert(
        model=filename_onnx,
        predicted_feature_name = [],
        minimum_ios_deployment_target='13',
    )
$ python export.py MobileNetV1_mAP=0.389.pth R9_ZSCveAHg_7s.wav
1/138: Converting Node Type Unsqueeze
...
138/138: Converting Node Type Sigmoid
Translation to CoreML spec completed. Now compiling the CoreML model.
.../coremltools/models/model.py:112: RuntimeWarning:
  You will not be able to run predict() on this Core ML model.
  Underlying exception message was: {
    NSLocalizedDescription = "Error in declaring network.";
}
  RuntimeWarning)
Model Compilation done.
Uh oh.. This was the first time I encounter this behavior, where the compilation completes but an error warning the model being unusable. This error is particularly vexing since it’s not any particular layer that’s causing the error, but the whole model somehow.
To figure out what part of the network is causing this error, down a rabbit hole I went..
Part 4: It’s not You; It’s Me?
The typical procedure is to simplify the model by
override the forward method until the problem goes away,
usually via some sort of
binary search. For example, I simplified down the model to the top five layers and
it was ok, but when I add the trunk of the model, i.e., features layer,
the error returns:
This is ok:
def forward(self, input):

    x = self.spectrogram_extractor(input)
    x = self.logmel_extractor(x)

    x = x.transpose(1, 3)
    x = self.bn0(x)
    x = x.transpose(1, 3)

    return x
But with features it ends up with the “Error in declaring network” message:
def forward(self, input):

    x = self.spectrogram_extractor(input)
    x = self.logmel_extractor(x)

    x = x.transpose(1, 3)
    x = self.bn0(x)
    x = x.transpose(1, 3)

    x = features(x) # <== somehow this is the culprit?

    return x
Going deeper, I then started decomposing the layers in features,
which is the MobileNetV1 trunck that is known to be supported. Could it
be this particular implementation of it?
I tried every possible combination, went as far as splitting the
model so it has independent inputs and outputs between the top 5 layers
and the trunk, yet all resulted in the same
error. No bueno. I kept on thinking there’s something wrong with this model
but just couldn’t isolate it.
On the verge of giving up after multiple days of trying, adding debug prints everywhere,
reading the source for coremltools, and even went as far as building that
package from source to see this mysterious compiled _MLModelProxy class
within libcoremlpython, it occurred to me that what coremltools does at
the end is to call the tool coremlc from Xcode to do the actual conversion.
Maybe this tool is the problem and it might give me some hints as to where
the problem might be?
Step 5: Merlin’s Beard!
The command to run to test this out is simple this:
xcrun coremlc compile /tmp/PANN.mlmodel /tmp/mlc_output
and it ran without a hitch, creating a set of file in the mlc_output folder
for defining the models and the trained weights. With this sign of progress, I then
tried this model within Xcode and it compiled the PANN.mlmodel file
without issues. The real test was to update the unit test and run predict
with this model, and lo and behold, the model actually does work,
contrary to the error message I been trying to eliminate! I muttered something
like “Merlin’s Beard!” but a bit more colorful.
The journey doesn’t end here, and the point of this tutorial is not about this
particular error message, but to understand more about the conversion process.
The lesson here is that the responsibility of coremltools is to
generate the specifications file (.mlmodel) and some sanity checking,
but the actual model conversion is done by coremlc. Therefore, if
you run into issues in this stage, try using coremlc and delve
into the compiled model if necessary to sort out the errors, spurious
or otherwise.
Step 6: Adding Some Pizazz
Having resolved the conversion error, we can proceed to getting the model
to run within our app. As a
consistency with the previous two posts, we want the model to export out
the mel-spectrogram layer so we can visualize it. The other was the notion
of having the model generate per-frame classifications in addition to the
per clip (as in one prediction spanning the entire input). The forward
method is modified largely based on the PANN model’s other framewise variants:
def forward(self, x, mixup_lambda=None):

    x = self.spectrogram_extractor(input)
    x = self.logmel_extractor(x)
    melspec = x #                <== save for outputting

    ...
    #                            modifications for framewise predictions
    x1 = F.max_pool1d(x, kernel_size=3, stride=1, padding=1)
    x2 = F.avg_pool1d(x, kernel_size=3, stride=1, padding=1)
    x = x1 + x2

    ...
    x = x.transpose(1, 2)
    x = F.relu_(self.fc1(x))
    segmentwise_output = torch.sigmoid(self.fc_audioset(x))
    (clipwise_output, _) = torch.max(segmentwise_output, dim=1)

    framewise_output = interpolate(
        segmentwise_output,
        self.interpolate_ratio)

    return clipwise_output, framewise_output, melspec
When exporting this modified version, a new error showed up, which is legitimate:
...
114/114: Converting Node Type Add
Translation to CoreML spec completed. Now compiling the CoreML model.
.../coremltools/models/model.py:112: RuntimeWarning:
 You will not be able to run predict() on this Core ML model.
 Underlying exception message was:
  Error compiling model: "compiler error:  Espresso exception:
   "Invalid blob shape": generic_elementwise_kernel:
   cannot broadcast [21, 1024, 1, 1, 1] and [20, 1025, 1, 1, 1]".
Step 7: Padding is a Chore..
This error resulted from the x = x1 + x2 step, which combines the outputs
from max_pool1d and avg_pool1d layers. Somehow one padded in the feature
dimension (correctly), and the other (AvgPool) in the time dimension (wrongly).
Turns out this bug was introduced by ONNX, a problem has since gotten fixed.
Nevertheless, this will not likely be the last time you run into issues with
padding, since even with the first beta of
coremltools version 4, some padding modes are not
yet supported. If you ever run into such a situation, and
for version 3, the fix is to define a custom conversion
function. (In version 4 will be similar but via different syntax).
To fix this conversion issue, the custom function looks for the
problematic layer (Pad_136) and ignores what ONNX exported
and adds a properly padded operation to the graph via the builder interface:
def _convert_pad(builder, node, graph, err):
    from onnx_coreml._operators import _convert_pad as _convert_pad_orig

    if node.name != 'Pad_136':
        # for all other nodes, use the original version
        _convert_pad_orig( builder, node, graph, err )
    else:
        # pull out the padding settings
        pads = node.attrs['pads']

        params_dict = {}
        params_dict['left'] = pads[2] # padding left
        params_dict['right'] = pads[5] # padding right
        params_dict['top'] = 0
        params_dict['bottom'] = 0
        params_dict['value'] = 0.0
        params_dict['padding_type']  = 'constant'

        builder.add_padding(
            name=node.name,
            input_name=node.inputs[0],
            output_name=node.outputs[0],
            **params_dict,
        )
This function is passed into coreml.convert call via the
custom_conversion_functions parameter:
    mlmodel = onnx_coreml.convert(
            model=filename_onnx,
            predicted_feature_name = [],
            custom_conversion_functions={'Pad':_convert_pad},
        )
Now when we run export, everything seems fine (ignoring the error message).
Horray! So in the future, if you run into layer conversion issues,
custom_conversion_functions
is a good remedy to try out. Only if the layer cannot be converted
this way into existing
Core ML layers that you can look into
custom layers. Be aware that custom layers will not run on
Apple Neural Engine, so there will be a performance tradeoff there.
Finally, before moving to Xcode, we will save the expected output from the sample wave from into a JSON file so we can validate the converted model. As a minor consequence of the Core ML error message, we cannot generate the prediction outputs from the Core ML model in python. Instead, we save the output from the Pytorch model, which is actually better since that is the true benchmark to validate against.
Step 8: Sound Classification in iOS
Because of the groundwork we laid out in part 1 and part 2 of this tutorial,
getting this PANN model to work in Xcode’s unit test and then on device will take
minimal effort. As before, we bring in the PANN.mlmodel into our main project,
and the files PANN_out.ring_hello.json, ring_hello.wav into the test section.
And since this is a classification model, there is a PANN_labels.json file
for the prediction labels to add to the main project. (Note: ring_hello.wav
is one sample window extracted out of R9_ZSCveAHg_7s.wav.)

Checking the converted model in Xcode and reviewing the inputs and outputs.
Next is to update our previous unit tests from part 2 with changes we made to the PANN model. The input is the same, so it’s the outputs that now include the clip-wise classification, in addition to the mel-spec. By modifying our Pytorch model to also output the mel-spec, we can re-use our previous unit test to sanity check this section of the model.
For the clip-wise output, it’s actually simpler since it’s a 1-dimensional output instead of 2 for mel-spec. The addition to our unit test is just these lines, looping through each class and compare Core ML’s output to that from Pytorch:
let output_clipwise: MLMultiArray = outputs.clip_output
print( "clip outputs: \(output_clipwise.shape)") // [1, 527]

// sanity check the shapes of our output
XCTAssertTrue( Int( truncating: output_clipwise.shape[1] ) == expected_clipwise.count,
               "incorrect shape[1]! \(output_clipwise.shape[1])
                \(expected_clipwise.count)" )

// compare every element of our spectrogram with those from the JSON file
for i in 0..<expected_clipwise.count {
    let test_idx: [NSNumber] = [ 0, NSNumber(value: i) ]
    let val = output_clipwise[ test_idx ].floatValue

    XCTAssertLessThan( abs( val - expected_clipwise[i].floatValue ), 0.1,
                       "clipwise vals different at \(i)! \(val),
                        \(expected_clipwise[i].floatValue)" )

}
When this test passes, the we know for sure that our model is working the same as in Pytorch. I actually caught a padding problem via this unit test and had to debug and fix it before proceeding to the next step, which is to update our app.

Happiness is our XCTests passing.
Step 9: Update the iOS App
The app also builds upon the one from part 2, which in addition
to capturing audio from the microphone to render the mel-spec,
to display the predicted sound class.
For this we access the model prediction’s
clip_output and do a quick and dirty loop to find the one with maximum probability
(switching to topk is left as an exercise for the reader). The class label
is then looked up and passed to a newly added UITableView to
render the prediction in a list.
Pretty simple compared to the UI work that was needed for mel-spec.
    // access the model output
    let output_clipwise: MLMultiArray = outputs.clip_output

    // pointer to walk the output MLMultiArray
    let pointer = UnsafeMutablePointer<Float32>(OpaquePointer(
      output_clipwise.dataPointer))

    // loop through the output classes; ugly but it'll do..
    let num_classes = self.class_labels!.count
    var max_class: Int = -1
    var max_class_prob: Float32 = 0.0
    for i in 0..<num_classes {
        let val = Float32( pointer[i] )
        if val > max_class_prob {
            max_class_prob = val
            max_class = i
        }
    }
    // look up the human-readable label for the class
    let max_class_label: String = (self.class_labels?[max_class]) as! String
    let row = OutputClass( max_class_label, max_class_prob, max_class )
    let predicted_classes = [ row ]

    // add to main queue to render the prediction
    DispatchQueue.main.sync {
        self.showPredictedClasses(with: predicted_classes)
    }
Step 10: Putting Everything Together
Barring any UI plumbing issues, the app build process should be smooth, since we validated the core functionalities with our unit tests. When the app starts up in the emulator, you can speak aloud and the app should show “speech” as the predict class. Mischief accomplished! :)
Testing the model prediction by speaking "My voice is my passport".
You can also build onto your mobile device and have it classify your sound scape, be it your pets, commotions in the city, or out in nature, with no internet access as I did with a hike in Sequoia. Perhaps for some motivated nature lover out there, you can fine-tune or retrain this audio model to identify different insects or birds in nature by sound. Wouldn’t that be great?
Testing the model on device, literally "in the wild". Turns out it's bird but this is a demo app after all.
Conclusion
To recap, we have taken a SOTA model trained using Pytorch, went through the
Core ML conversion and remedy the issues, and onto our iOS devices for
predicting the sound classes captured via the microphone. While these
model conversion issues will be less problematic as Apple improves its coremltools
package, the rest of the process will remain applicable, especially the tests
we added to ensure not only the correctness of this initial conversion, but subsequent changes
to the model, Core ML versions, iOS versions, etc.
With this pipeline set up, you can start the fun part of exploring what sound- enabled apps you could build. One property of sound analysis is that it often demands real-time, low-latency, and high performance, for which on-device inference (and maybe even training) makes a lot of sense. So perhaps you have ideas for a nature sound app, or apps to help the deaf and hard-of-hearing, or games based on sound, or household or industrial monitoring for anomaly event detection, or health related apps like sleep monitoring, or scientific data collection via remote monitoring, there’s a great foundation now you can build them on. Go explore!