How to Deploy PyTorch Models with Core ML Conversion Issues (Part 2)
Intro
Have you ever tried to convert a Pytorch model to Core ML and ran into error messages such as the following?
TypeError: Error while converting op of type: Slice.
 Error message: Input shape not available
Or
.../model.py:112: RuntimeWarning: You will not be able to run predict() on this
Core ML model. Underlying exception message was: Error compiling model:
"compiler error:  Error saving network to file.".
Huh? Or the occasional ONNX error:
RuntimeError: Exporting the operator log10 to ONNX opset version 9 is
not supported. Please open a bug to request ONNX export support for
the missing operator.
If so, you’re not alone. These are actual errors I encountered converting one single Pytorch model with pretty basic layers! Some are easy to fix, while others may require some architectural changes to the model.
In this post, we will walk though the steps in resolving these conversion headaches in order to get our example Pytorch model to do inferencing on iPhones via Core ML. At the end of the process, we’d build and iOS app for doing live inferencing with our Pytorch model, going from microphone input into visualized melspectrograms:
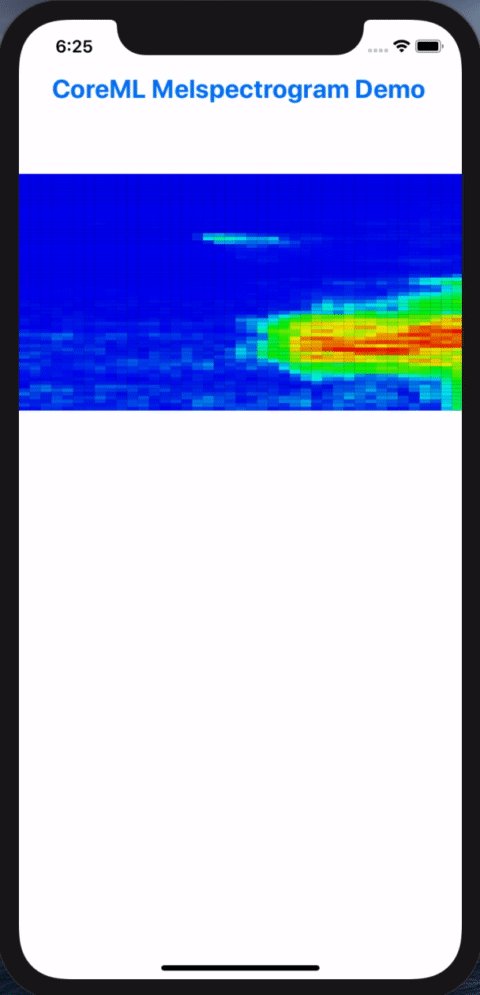
Melspectorgram of an actor saying "My voice is my passport", from Sneakers (1992)
As a note, this post builds upon the model from part 1 of this post on how to deploy Pytorch models on iOS via Core ML, so if you haven’t read it, it’d b very helpful to give it a quick scan so you can pick up where we left off.
Let’s get started.
Step 0: The Plan
We will use the same pipeline we set up in the previous post for going from Pytorch to Core ML, including the tests we put in place to ensure the conversions are valid. This pipeline will be critical during our debugging process, since we most likely will be modifying the model in some way. By the time the model is converted successfully and our unit test is passing in Xcode, the rest of the way will be smooth sailing (especially for iOS developers).
In this tutorial, we will go through these steps:
- Update our Pytorch model to compute melspectrograms
- Attempt to convert the model to Core ML
- Debug and fix the conversion errors
- Create a simple app to do live inferencing on device

Same preliminaries as part 1, you will need Xcode 11.3+ and therefore MacOS Mojave or Catalina. To get set up, clone the project’s repo, create a virtualenv, and install the requirements:
git clone https://github.com/ml-illustrated/Pytorch-CoreML-Spectrogram
cd Pytorch-CoreML-Spectrogram/python

python -m virtualenv ~/.virtualenvs/coreml_spectrogram
source ~/.virtualenvs/coreml_spectrogram/bin/activate

pip install -r requirements.txt
Step 1: Update the Pytorch Model
Our previous model computes a spectrogram, but it’s more common to work with melspectrograms, which are designed to more closely reflect the frequency response of human audio perception. Greatly simplified, they emphasize the low and mid frequencies over the high ones.
To add this to our Pytorch model, and continuing to use the library
torchlibrosa,
we just need to add a second
layer on top of the existing Spectrogram layer.
A bit of confession: I did do a slight of hand
in the previous post to bypass a conversion error, which we will restore
so we get to tackle it this time around.
Here’s the updated model, using default audio analysis parameters that we won’t
get into, other to say that not only can you customize them to your particular
applications, but also the layers can be trainable to improve accuracy
(by setting freeze_parameters to False). How cool is that!?
class WaveToLogmelSpectrogram(nn.Module):

    def __init__(
            self,
            sample_rate=32000,
            n_fft=1024,
            hop_length=320,
            mel_bins=64
    ):
        super(WaveToLogmelSpectrogram, self).__init__()

        self.spec_extractor = torchlibrosa.stft.Spectrogram(
            n_fft=n_fft,
            hop_length=hop_length,
        )

        # create the new layer
        self.logmel_extractor = torchlibrosa.stft.LogmelFilterBank(
            sr=sample_rate,
            n_fft=n_fft,
            n_mels=mel_bins,
        )

    def forward( self, x ):
        x = self.spec_extractor( x )
        # add to forward pass
        return self.logmel_extractor( x )
Pytorch makes it so simple: instantiate a LogmelFilterBank layer
and add it to the forward method. Let’s
run the conversion script and see what happens:
$ python model.py ../Pytorch-CoreML-SpectrogramTests/bonjour.wav
  /tmp/wave__melspec.mlmodel  /tmp/melspec_out.bonjour.json

.../torch/onnx/utils.py:738: UserWarning: ONNX export failed on ATen operator
 log10 because torch.onnx.symbolic_opset9.log10 does not exist
  .format(op_name, opset_version, op_name))
Traceback (most recent call last):
  File "model.py", line 172, in <module>
    mlmodel_output = model.convert_to_coreml( fn_mlmodel, sample_input )
  ...
Step 2: Tackle the First Conversion Error
The error isn’t good, but the nice thing is ONNX tells us which operator is causing the error.
We can do a quick search for ONNX to see if log10 is supported in newer
opsets, but doesn’t look like it. Since torchlibrosa is open source, we
can look for where log10 is used, and it’s in power_to_db of
stft.py:
def power_to_db(self, input):
    """Power to db, this function is the pytorch implementation of
    librosa.core.power_to_lb
    """
    log_spec = 10.0 * torch.log10(torch.clamp(input, min=self.amin, max=np.inf))
    ...
Since log10 can be easily converted to be based on log2, the one that ONNX
(and everyone) supports, we could update this line to be:
    log_spec = 10.0 * torch.log(torch.clamp(input, min=self.amin, max=np.inf)) \
                / np.log( 10.0 )
As to how you’d actually make this change, you can either fork/clone the repo
and make the change,
or not duplicate the entire library and make our change by subclassing
LogmelFilterBank and overriding this function. For experimentation,
the former is faster, but for production my preference is for the latter,
if the change is this minor. In this case, I forked the repo and may submit
a pull request for the (minor) changes needed for Core ML conversion.
With the change for log10 in place, let’s run our conversion script again.
Our ONNX error went away (yay!), but a new one appears (boo…):
1/18: Converting Node Type Unsqueeze
2/18: Converting Node Type Pad
Traceback (most recent call last):
  File "model.py", line 172, in <module>
    mlmodel_output = model.convert_to_coreml( fn_mlmodel, sample_input )
  File "model.py", line 86, in convert_to_coreml
    **convert_params,
  ...
  File ".../onnx_coreml/_operators.py", line 1333, in _get_pad_params
    pad_t, pad_l, pad_b, pad_r = pads
ValueError: not enough values to unpack (expected 4, got 2)
Step 3: The Curse of Tensor Shapes
As the stack trace indicates, the error is now in the package onnx-coreml.
The layer in question is early on, likely in the Spectrogram
module. With ONNX conversion succeeding, you can open the .onnx file with
Netron to inspect what this layer might be.
!()[/images/2020-06-01/melspec_model_netron.png “Our ONNX melspectrogram model seen within Netron.”)
This is the slight of hand I mentioned earlier. By default the Fourier
window is centered, which requires the input waveform to be padded. I bypassed
this with a center=False option in the first model, but depending on your
situation, you may have to get centering to work (such as for a pre-trained
model).
If we go back to torchlibrosa and in the forward method of Spectrogram
in stft.py,
we see the first two operations of our network:
def forward(self, input):
  x = input[:, None, :]   # (batch_size, channels_num, data_length)

 if self.center:
     x = F.pad(x, pad=(self.n_fft // 2, self.n_fft // 2), mode=self.pad_mode)
The first becomes a Unsqueeze layer in ONNX, and the second is a Pad layer, both being
very common operators. What’s unusual about our model is that because audio
is only 2 dimensional (batch, width), onnx-coreml throws a fit because it’s expecting a
typical batch, channel, height, width 4D tensor. You will quickly become
accustomed to Pytorch being super flexible with its tensor shapes, whereas Core ML
is very rigid. When in doubt, fix the shapes of your tensors in Pytorch
during export and conversion.
The solution for this padding error is to expand the input tensor to 4D, do the
padding, and reshape it back to 3D that the rest of the network expects. Not
great, but gets the job done. We make a second change to stft.py when
center=True is passed into Spectrogram:
def forward(self, input):
  if self.center:
    x = input[:, None, :, None]   # (batch_size, channels_num, data_length, data_height)
    x = F.pad(x, pad=(0, 0, self.n_fft // 2, self.n_fft // 2), mode=self.pad_mode)
    x = x.squeeze(3) # remove the data_height dim
  else:
    x = input[:, None, :]   # (batch_size, channels_num, data_length)
How did I know this is the solution? Likely after lots of Googling, reading
Github issues, and even resorting to debugging the onnx-coreml code.
Not very encouraging, but the situation is improving.
Back to our model: Let’s run our conversion script and see if the Pad
error goes away:
1/18: Converting Node Type Unsqueeze
2/18: Converting Node Type Unsqueeze
3/18: Converting Node Type Pad
4/18: Converting Node Type Squeeze
5/18: Converting Node Type Conv
6/18: Converting Node Type Conv
7/18: Converting Node Type Unsqueeze
8/18: Converting Node Type Transpose
9/18: Converting Node Type Unsqueeze
10/18: Converting Node Type Transpose
11/18: Converting Node Type Pow
12/18: Converting Node Type Pow
13/18: Converting Node Type Add
14/18: Converting Node Type MatMul
15/18: Converting Node Type Clip
16/18: Converting Node Type Log
17/18: Converting Node Type Mul
18/18: Converting Node Type Div
Translation to CoreML spec completed. Now compiling the CoreML model.
.../coremltools/models/model.py:112: RuntimeWarning: You will not be able to
run predict() on this Core ML model. Underlying exception message was:
Error compiling model: "compiler error:  Error saving network to file.".
The Pad error is gone, and all of the layers converted successfully. But
now we get a compiler error about saving to file?? Huh?
Step 4: What in the World!?
Why can’t Core ML save the file? And what compiler is this, clang, Xcode, or
something else? Long story short, onnx-coreml does the prep work for the
conversion, which is to generate a specification file for the tool coremlc
(distributed within Xcode), which does
the actual .mlmodel file generation via compilation.
As such, we are actually seeing the error from the coremlc
compiler. If you’d like more details, check out this blog post on
the inner workings of Core ML models.
As far as I know, coremlc is not open source, so we are stuck with trying
to figure out why our model is “unsavable.” For this I resort
to black-box debugging, the process of simplifying the network via binary
searches to see if the error persists or goes away.
This is quite unpleasant work, but fortunately with Pytorch it’s very easy
to bypass layers by inserting return x within the forward method and
test convert the abridged model. For example, we can bypass the LogmelFilterBank
layer since it’s the new part we added. The error goes away!
class WaveToLogmelSpectrogram(nn.Module):
    ...

    def forward( self, x ):
        x = self.spec_extractor( x )
        return x # <========= DEBUGGING EXPORT ERROR
        # return self.logmel_extractor( x )
We now know it’s within LogmelFilterBank, so we do the same return x
in its forward method until the error goes away. In doing this
we isolate the cause to something within power_to_db.
With some further isolation in that function,
we find out that if we have torch.clamp, Core ML barfs, but if we
get rid of it and pass
in input to torch.log directly, the model converts:
  # ERRORS:
  log_spec = 10.0 * torch.log(torch.clamp(input, min=self.amin, max=np.inf)) \
              / np.log(10)
  # OK: just to make error go away
  log_spec = 10.0 * torch.log( input ) / np.log(10)
I guess Core ML doesn’t like np.inf, which is redundant in this case since
that’s the default max for torch.clamp anyway, so let’s get rid
of max=np.inf:
  # the no-error version
  log_spec = 10.0 * torch.log(torch.clamp(input, min=self.amin)) / np.log(10)
When we run our conversion script, it completes! Horray!! Remember that in our script, we verify the converted model by comparing the outputs between Pytorch and Core ML. Without this pipeline checking this, we’d be relying on guessing or leaps of faith. Not good. I’ll repeat the refrain from last post: “Trust, but verify.”
If we turn on plot_spec=True, we can also visually inspect the three
melspectrograms using our test wav file.
Slight differences for the Core ML output, but that’ll
do for now:

I do want to emphasize that the problem here is with Core ML, not with
the torchlibrosa library. The latter implemented these layers perfectly
for Pytorch, and the onus is on Core ML to convert these layers, or at least
not barf with no helpful indicator as to what the issues might be. I’m assuming
Apple is working on improving these tools for their developers…
Step 5: Update Unit Test in Xcode
With our newly converted Core ML model, we can drag and drop the .mlmodel
file into our project (and make sure the Test target is also selected). We’d
also drag the validation JSON file into the Test target so the unit test can
validate the “on device” melspectrogram against it.
As for the unit test itself, the changes are pleasantly minimal: we’d need
to change the class name of our ML model to wave__melspec, and update
the output layer name to be ._25. The rest is already taken care of, in
terms of loading the test wav file and the JSON data, as well as validating the
melspectrograms. Here’s the handful of Swift lines to be changed in the test:
let model = wave__melspec()
typealias NetworkOutput = wave__melspecOutput

...

// Send the waveform samples into the model to generate the Spectrogram
let raw_outputs = try! model.model.prediction(from: provider)

// convert raw dictionary into our model's output object
let outputs = NetworkOutput( features: raw_outputs )
// the output we're interested in is "_25"
let output_spectrogram: MLMultiArray = outputs._25
When we run this unit test, it passed on the first try. Nice!

Step 6: Good Artists Borrow, Great Artists…
We’re now confident that this model is computing the melspectrograms
correctly, wouldn’t it be great if we could visualize them on device,
similar to how we plot them using matplotlib? Even better, could we use
the microphone to capture live audio, do inference using our ML model,
and plot the melspectrograms in real time?
This is exactly what this demo app does, involving four main components:
- Use AudioEngine to capture live samples from the microphone
- Convert the live samples into the format our ML model needs
- Run inference and convert the model output into an image-like format
- Draw the melspectrogram in a simple UI
Since I’m new to iOS, I had to “borrow” sample code for steps 1 and 4, whereas 2 and 3 we have done in our unit test already. For 1, I followed Apple’s example for AudioEngine here, and the UI for drawing the spectrogram itself is adapted from the heatmap UI from this repo (among other great sample Core ML projects there). There’s also a bit of audio format conversion code I got from Stack Overflow. I’m very thankful for those who share their code and knowledge with others!
Here’s the highlight for step 1, capturing live audio:
let inputNode = audioEngine.inputNode
// start audio capture by installing a Tap
inputNode.installTap(
    onBus: 0,
    bufferSize: AVAudioFrameCount(downSampleRate * 2),
    format: originalAudioFormat
) {
    (buffer: AVAudioPCMBuffer!, time: AVAudioTime!) in
    // closure to process the captured audio, buffer size dictated by AudioEngine/device
    ...
}
Step 3 and 4 are made simple by two classes, one for format conversion into
Swift Arrays, and the DrawSpecView UI component from tucan9389 for rasterizing into images:
if let outFeatures = try? self.model?.model.prediction(from: provider) {

  let outputs = NetworkOutput(features: outFeatures)
  let output_spectrogram: MLMultiArray = outputs._25

  // melspectrogram is in MLMultiArray in decibels. Convert to 0..1
  // for visualization and then pass the converted spectrogram
  // to the UI element drawSpecView
  drawSpecView.spectrogram = spec_converter.convertTo2DArray(
    from: output_spectrogram
  )
}
Step 7: The App is Alive!
There’s some plumbing that’s needed to hook everything together in the
main ViewController, the details of which I’ll leave out since this blog
is more about the ML side of things. For the uninitiated with Swift, I’d say
after reading the code for a few Core ML apps, you will start to see
a common structure on how requests are passed between queues,
set up separately for the input processing,
model predictions, and updating the UI. When in doubt, clone an app or two and
start tinkering and experimenting. That’s what this project is meant for!
You might have already done this at the outset of this post, which is to clone the code, open it in Xcode, and click “Run” to see if it works. Hopefully it does, and you will see the app in the simulator, displaying the melspectrogram from your computer’s microphone. If not, please open a issue so we can make this demo app more robust.
To run the app on your phone or tablet, you’d need to have an Apple developer’s account, configure it within Xcode’s Preferences > Accounts settings, and go into this project’s settings > Signing & Capabilities, and update the Team to your account.

Lastly, you will need to accept the certificate on your iOS device, which is pretty straight forward. With these steps done, you can connect your phone to you computer via a USB cable, and the device will appear in the drop down to the right of the Run button at the top. Select that as the run target and click Run, and if everything builds correctly, the app will launch on your actual device and analyze the audio from the device’s microphone, using the model we created in Pytorch.
Here’s a quick demo of this app running on an iPhone analyzing a movie clip from one of my favorite movies Sneakers (1999):
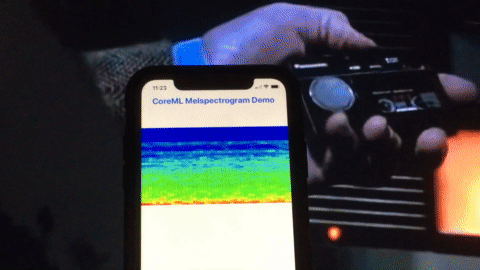
Credits: Sneakers (1992), Youtube clip.
Step 8: Add One More Unit Test
Before we call it a wrap, let’s add a test for one of the two components we
added for rendering our melspectrogram. The first component,
SpectrogramConverter, is easier to unit test since it takes a MLMultiArray
and outputs a 2D Array. Our test would re-use the spectrogram from the JSON
file from our first test, convert it into a MLMultiArray, and call this
converter. The test then sanity checks the output to be float32s that are
normalized between 0 and 1. This way if we ever change the output of our
model in some way, this test will automatically validate this conversion
process. You can check out the code in the function func test_convert_spectrogram()
in the file Pytorch_CoreML_SpectrogramTests.swift.
As for the DrawSpecView component, this is an UI element and there are ways
to write tests for them, but I have not delved into this topic yet so we
will leave UI tests for another time.
Conclusion
To recap, we have taken a Pytorch model, modified it to resolve the conversion errors, verified it using unit tests, and create a live demo to run the model inference on iOS devices. The process is somewhat manageable, helped by the simplicity of our model, and more importantly, how early we did this conversion check. It’s by design that we have not done any model training, dataset preparation, annotation cleaning, optimization, all that good stuff. Imagine we spent weeks or months training a large model, get it to some SOTA accuracy, and then tried to convert that model containing likely hundreds of layers. More likely than not, there will be changes to the model necessary to get past the conversion errors. Consequently, re-training would be needed, setting your project back. So if you get anything out of this post, it’s that it’d best to validate the conversion process as early as possible.
I hope you’re now better informed and prepared to tackle your next Core ML project. Whether it might be for processing audio, images, video, text, or sensor data, the process and pipelines described here should be applicable to ensure that the Pytorch models would work correctly on iOS and macOS devices. In the next blog post in this series, I’ll tackle a more realistic model conversion scenario using a larger model and share the challenges it presents.