How to Deploy PyTorch Models to iOS with Core ML via Tests
Intro
Perhaps you have an itch to run a model from Pytorch on iOS devices, whether it might be for image manipulation, NLP, audio analysis, or even video understanding. You might of heard about Apple’s Neural Engine (ANE), and the notion of running your Pytorch model on accelerated silicon in millions of pockets does seem pretty attractive.
I had a similar idea, or more like a conceit, to work on an end-to-end ML project where the model is trained in PyTorch, and inference is done on-device via Core ML on iOS devices so it can be accelerated by the ANE. This post is the first in a series on how I (finally) got the project to work.
For the TL;DR readers, here’s the nutshell: As of May of 2020, there isn’t a push-button tool to get from a Pytorch model onto iOS, but a series of steps that should be validated along the way. The bottleneck is dictated by the set of layers and activations that Core ML supports, so the earlier you verify that your model architecture will work with Core ML, the better. In this series of tutorials, I’ll walk through the steps and help navigate some of the issues you might encounter. When it does finally work on device, it will feel pretty magical.
Let’s get started.
Step 0: The Plan
The first step is to check whether your Pytorch model can be converted into a Core ML model. This may seem obvious, but at least for me, I have the tendency to focus on improving the model’s accuracy first, only to find out that some novel layer or activation that provided the accuracy boost turned out to not be supported by Core ML and having to backtrack. Ugh!
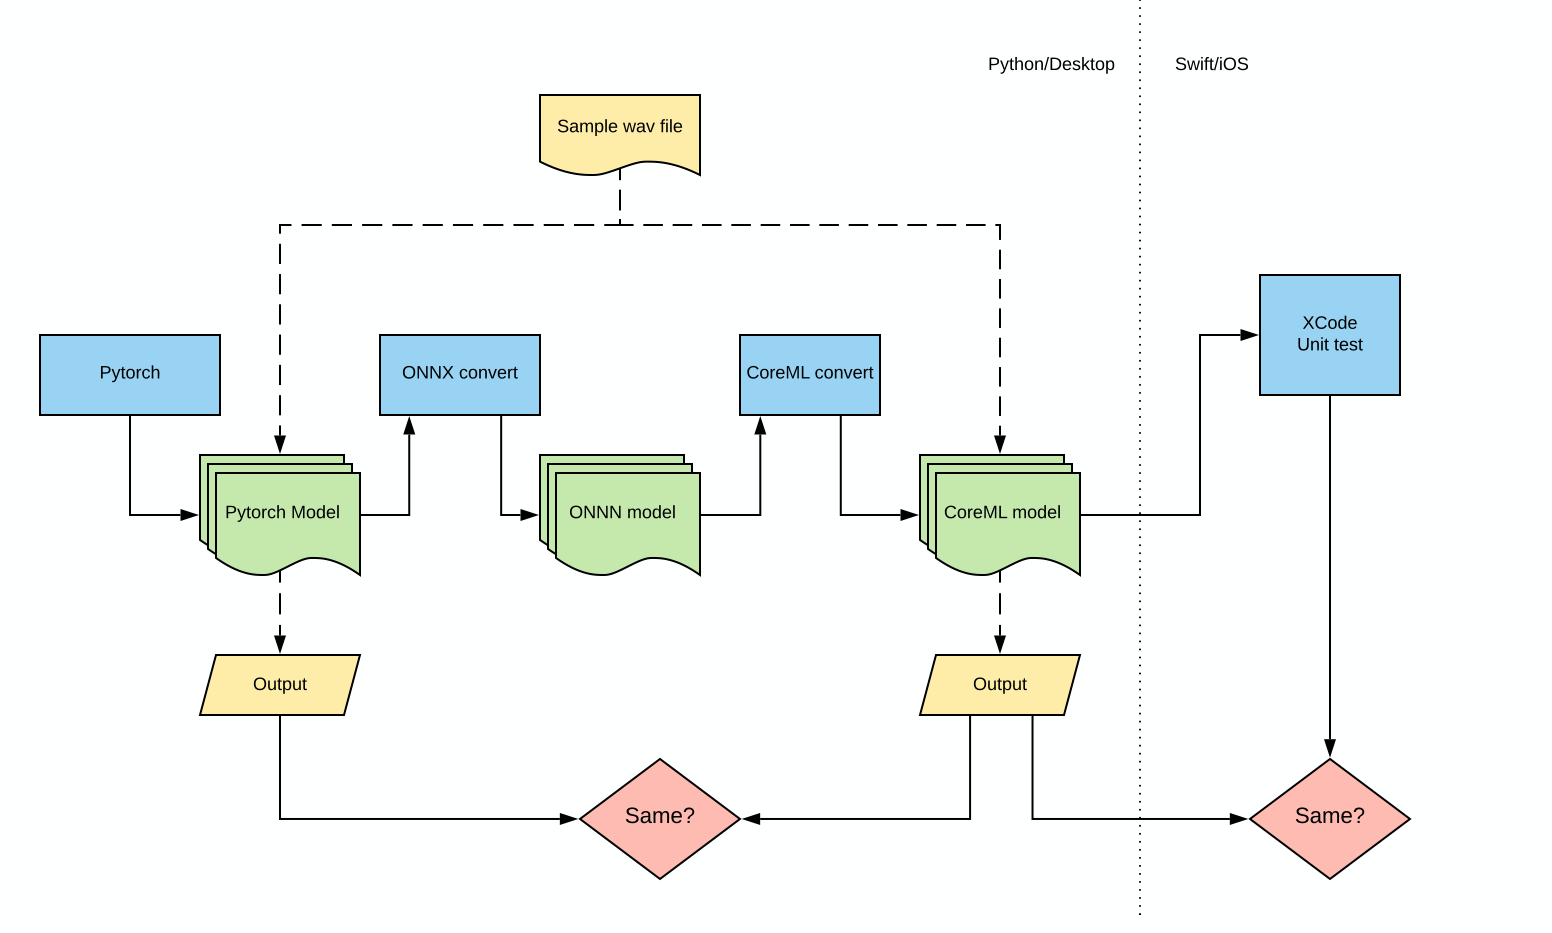
To avoid this scenario, I start off a project by setting up a skeletal pipeline for converting my Pytorch model to Core ML, and more importantly, having tests along the way to validate that the conversions are indeed correct. Once you get this pipeline in place, then you can focus on training and improving the model, knowing that the model will behave the same way on device as in Pytorch.
In this tutorial, we will go through these steps:
- Create a simple Pytorch model with imported modules
- Convert the model to Core ML and validate the outputs
- Create a XCode project and import the Core ML model
- Write a test in Swift that compares the on-device inference with one from Core ML (or Pytorch)
Some preliminaries: You will need XCode to run the Core ML conversion steps, and minimally XCode version 11 or newer. For this tutorial we’d be converting the model to Core ML 3, which requires XCode 11.3+ and therefore MacOS Mojave or Catalina. The screen recording associated with this post was recorded on MacOS 10.15.4 and XCode 11.4.1.
To get set up, clone the project’s repo, create a virtualenv, and install the requirements:
git clone https://github.com/ml-illustrated/Pytorch-CoreML-Skeleton
cd Pytorch-CoreML-Skeleton/python

python -m virtualenv ~/.virtualenvs/coreml
source ~/.virtualenvs/coreml/bin/activate

pip install -r requirements.txt
Step 1: Create our Pytorch Model
We will create a compact model in Pytorch, but not a toy example using basic
layers. To make things a bit interesting, this model takes in raw audio waveforms
and generates the spectrograms, often used as a preprocessor in audio analysis
tasks. There are a few good libraries out there for this, and we will use the
excellent torchlibrosa for
this.
With torchlibrosa, our model couldn’t be simpler, since it’s simply
a single layer! Here’s the extent of the model:
import torch
from torch import nn
import torchlibrosa

class WaveToSpectrogram(nn.Module):

    def __init__( self, n_fft, hop_length, center=False ):
        super(WaveToSpectrogram, self).__init__()

        self.spec_extractor = torchlibrosa.stft.Spectrogram(
            n_fft=n_fft,
            hop_length=hop_length,
            center=center,
        )

    def forward( self, x ):
        return self.spec_extractor( x )
Let’s instantiate the model and print its layers:
>>> model = WaveToSpectrogram( n_fft=1024, hop_length=512 )
>>> print( model )

WaveToSpectrogram(
  (spec_extractor): Spectrogram(
    (stft): STFT(
      (conv_real): Conv1d(1, 513, kernel_size=(1024,), stride=(512,), bias=False)
      (conv_imag): Conv1d(1, 513, kernel_size=(1024,), stride=(512,), bias=False)
    )
  )
)
The Spectrogram layer is implemented using two Conv1d layers to compute the
short-time Fourier transforms (STFT), which is a standard convolution layer
so the chances of Core ML support is high. Let’s find out.
Step 2: Converting the Model to ONNX
The conversion process is actually two steps, first to ONNX, and then ONNX to Core ML. The support for Pytorch to ONNX has been quite robust since version 1.3, as in once the model is converted to ONNX successfully, the ONNX model behaves the same way as in Pytorch.
Nevertheless, before we start the conversion process, we should use the same input that we will use to validate the outputs of the converted models. Specifically, for the same input wav file, we will compare the output spectrograms from Pytorch to that of ONNX, Core ML on MacOS, and Core ML “on device”, in quotes because it’d be within the XCode simulator. You might think there should be no difference across all of them, but for various reasons, they might. Best to “trust, but verify.”
The Pytorch to ONNX step is a on-liner, and the input and output names are optional:
def convert_to_onnx( self, filename_onnx, sample_input ):

    input_names = [ 'input.1' ]
    output_names = [ '14' ]

    torch.onnx.export(
        self,
        torch.from_numpy( sample_input ),
        filename_onnx,
        input_names=input_names,
        output_names=output_names,
    )
We will read in the test wav file and send it into the export function:
# load in waveform
import soundfile
waveform, samplerate = soundfile.read( 'bonjour.wav' )
sample_input = waveform[:32000].astype( dtype=np.float32 )

# instantiate model and export it
model = WaveToSpectrogram( n_fft=1024, hop_length=512 )

model.convert_to_onnx( '/tmp/wave__spectrogram_model.onnx', sample_input )
For this model the call torch.onnx.export() runs without a hitch. This may not
always be the case, and if you encounter problems with your model, a quick thing to try is
going up the opset_version=11 and see if the layers in question are supported.
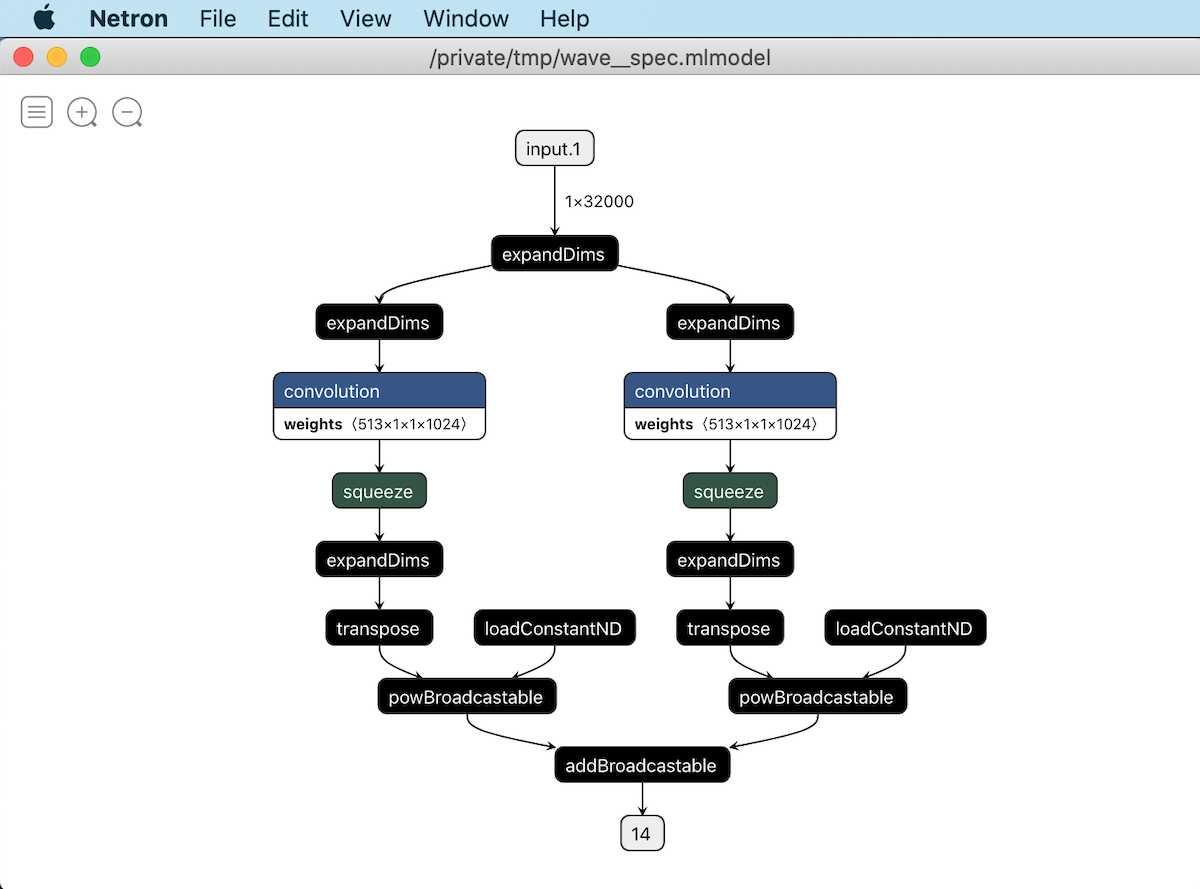
You might ask where the input.1 and 14 names came from. This is
done by the excellent tool Netron,
which provides more details on the layers of the network, as well as
all the operations the model performs. Here’s what this model looks like via Netron:
Step 3: Converting the ONNX to Core ML
This is the step that gave me the most trouble, so if your model gets past this, you’d be in pretty good shape. Tackling conversion issues is beyond the scope of this tutorial, and I’ll have a separate post to through a few conversion errors and how to resolve them.
The Core ML conversion is done via the library onnx-coreml.
We’d be skipping most of its options for this simple model, but typical models
you’d likely need to read up on them to ensure proper conversion. If you get
stuck, I’d highly recommend Core ML Survival Guide by
Matthijs Hollemans. The book saved me many hours of fruitless searches and
frustration.
Depending on the version of onnx-coreml you installed, you either pass in
the file name of the ONNX model or the model loaded into memory. The conversion
is a single call:
import onnx_coreml

mlmodel = onnx_coreml.convert(
    model = '/tmp/wave__spectrogram_model.onnx',
    predicted_feature_name = [],
    minimum_ios_deployment_target='13',
)
mlmodel.save( '/tmp/wave__spec.mlmodel' )
And you should see an output log similar to the following, the most important message being the last “Model Compilation done.”:
1/10: Converting Node Type Unsqueeze
2/10: Converting Node Type Conv
3/10: Converting Node Type Conv
4/10: Converting Node Type Unsqueeze
5/10: Converting Node Type Transpose
6/10: Converting Node Type Unsqueeze
7/10: Converting Node Type Transpose
8/10: Converting Node Type Pow
9/10: Converting Node Type Pow
10/10: Converting Node Type Add
Translation to CoreML spec completed. Now compiling the CoreML model.
Model Compilation done.
However, when a conversion fails, you might see something along the lines of:
1/11: Converting Node Type Unsqueeze
2/11: Converting Node Type Pad
Traceback (most recent call last):
  File "model.py", line 127, in <module>
    mlmodel_output = model.convert_to_coreml( fn_mlmodel, sample_input )
  File "model.py", line 69, in convert_to_coreml
    **convert_params,
...
  File ".../onnx_coreml/_operators.py", line 217, in _add_conv_like_op
    get_params_func(builder, node, graph, err, params_dict)
  File ".../onnx_coreml/_operators.py", line 1333, in _get_pad_params
    pad_t, pad_l, pad_b, pad_r = pads
ValueError: not enough values to unpack (expected 4, got 2)
Not too elucidating, but I digress… Back to our happy path of
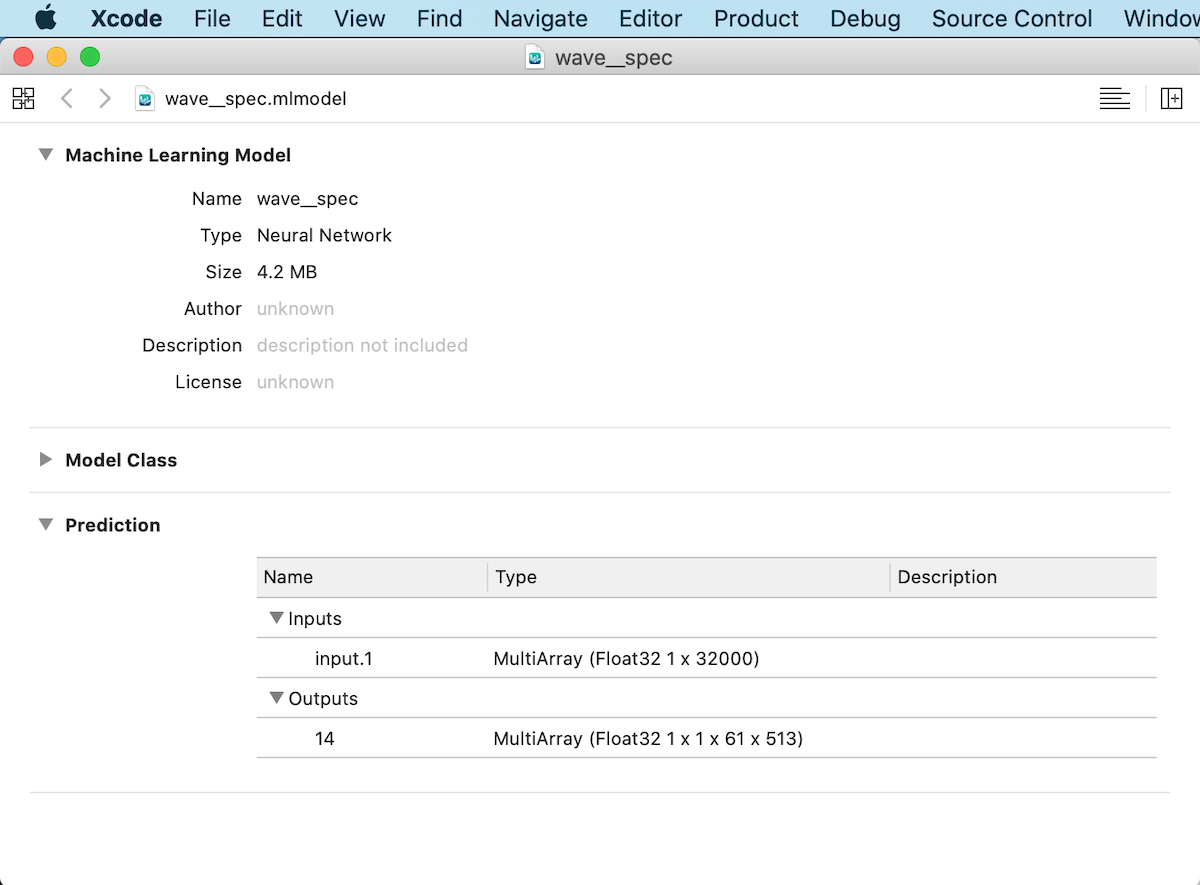
Core ML model conversion. You can open the .mlmodel file to check it, via
XCode or Netron. In XCode it shows you the expected inputs and outputs of
the model. In our case both are of type MLMultiArry, which you can think of
as comparable to Numpy’s ndarrays.
Step 4: Verifying the Converted Core ML Model
Before we switch gears into XCode land, we need to do two things. First, we will save the expected output spectrogram into a file for comparing with in our unit test within XCode. The second is to compare the Core ML model output to Pytorch’s, as a sanity check beforehand. I have ran into subtle bugs between the two, and it’s much easier to do this check while we are in Python and Numpy land (for me at least).
I won’t bother going over the code for generating Pytorch outputs,
other than saying to use the same bonjour.wav file as the input. For Core ML,
its Python interface is pretty easy to use, since the Core ML models
take inputs and generate outputs as numpy arrays.
So to do inference with Core ML in Python, we just need to set up the inputs
as a dictionary, and pull out the results from the output dictionary like so:
model_inputs = {
    'input.1': sample_input
}
# do forward pass
mlmodel_outputs = mlmodel.predict(model_inputs, useCPUOnly=True)

# fetch the spectrogram from output dictionary
mlmodel_spectrogram = mlmodel_outputs[ '14' ]

assert torch_spectrogram.shape == mlmodel_spectrogram.shape
assert np.allclose( torch_spectrogram, mlmodel_spectrogram )
The validation in Python land is just a couple of assert statements, using
numpy’s allclose() call. For this model the outputs are near identical, so we
can be confident that the Core ML is working properly. Not that we have useCPUOnly
set to true
so the inference is done in float32, whereas on GPU (and ANE) it’d be in
float16. You can set useCPUOnly to false and see how far the model outputs
may deviate, so you know what to expect on device.
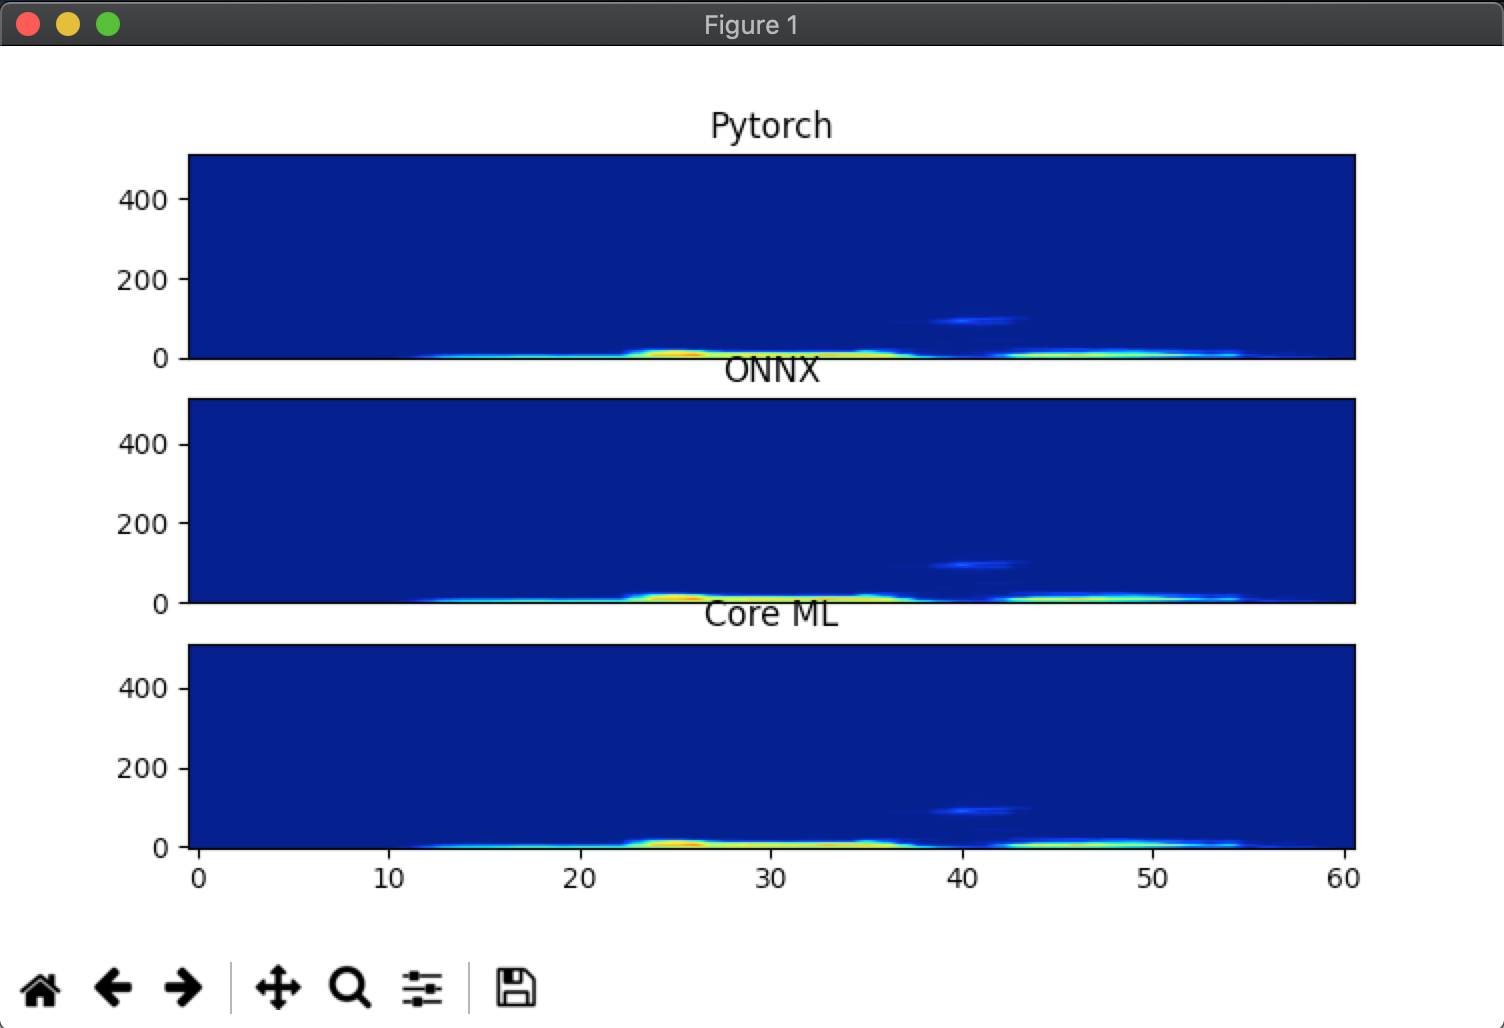
It’s also super-super important to have a way to visualize the data you’re working with. For audio, spectrograms can be readily turned into images for easy inspection. The this repo the python code has a quick and dirty function to plot the three spectrograms so we can visually check that all three outputs are identical to each other.
One last step before we switch to XCode land. We want to save this spectrogram,
either from Pytorch or Core ML models, for loading into our unit test within XCode.
We won’t be able to use numpy.save() or even pickle.dump(), at least not
directly, so we will fall back to using JSON. There are Swift extensions for
working with Numpy arrays, but let’s keep things simple for now.
import json
with open( fn_json, 'w' ) as fp:
    json.dump( mlmodel_output.tolist(), fp )
Step 5: Transport Yourself to XCode Land
Bear in mind that I am not well versed in XCode and Swift, and know only enough to get by. I’m sharing the bare minimum here to get you started, as there are plenty of resources elsewhere on this topic. If you want a crash coarse on the Swift language, check out A Swift Tour.
For this tutorial simply open the file Pytorch-CoreML-Skeleton.xcodeproj and
the basics are set up for you. If you want to see how the project was created
from scratch, I saved the actual process in the accompanying screen recording,
around the 3 minute 30 seconds mark. When creating the project, just be sure to select the
“Include Unit Tests” option.
If this is your first time in XCode, there’s a lot to take in but don’t worry,
we will keep the steps to a bare minimum. Normally you’d drag and drop the .mlmodel
file into the main project’s File navigator, and the bonjour.wav and the JSON file we generated
in Python into the Test target. These steps are done already in this project,
but you’re welcome to check out the recording if/when you want to create your own
project from scratch.
Now, along the top left panel, there’s a row of icons, mostly likely with the left-most one (Project navigator) selected. Click on the sixth one from the left, named “Test navigator”, and you should see two tests like the following:
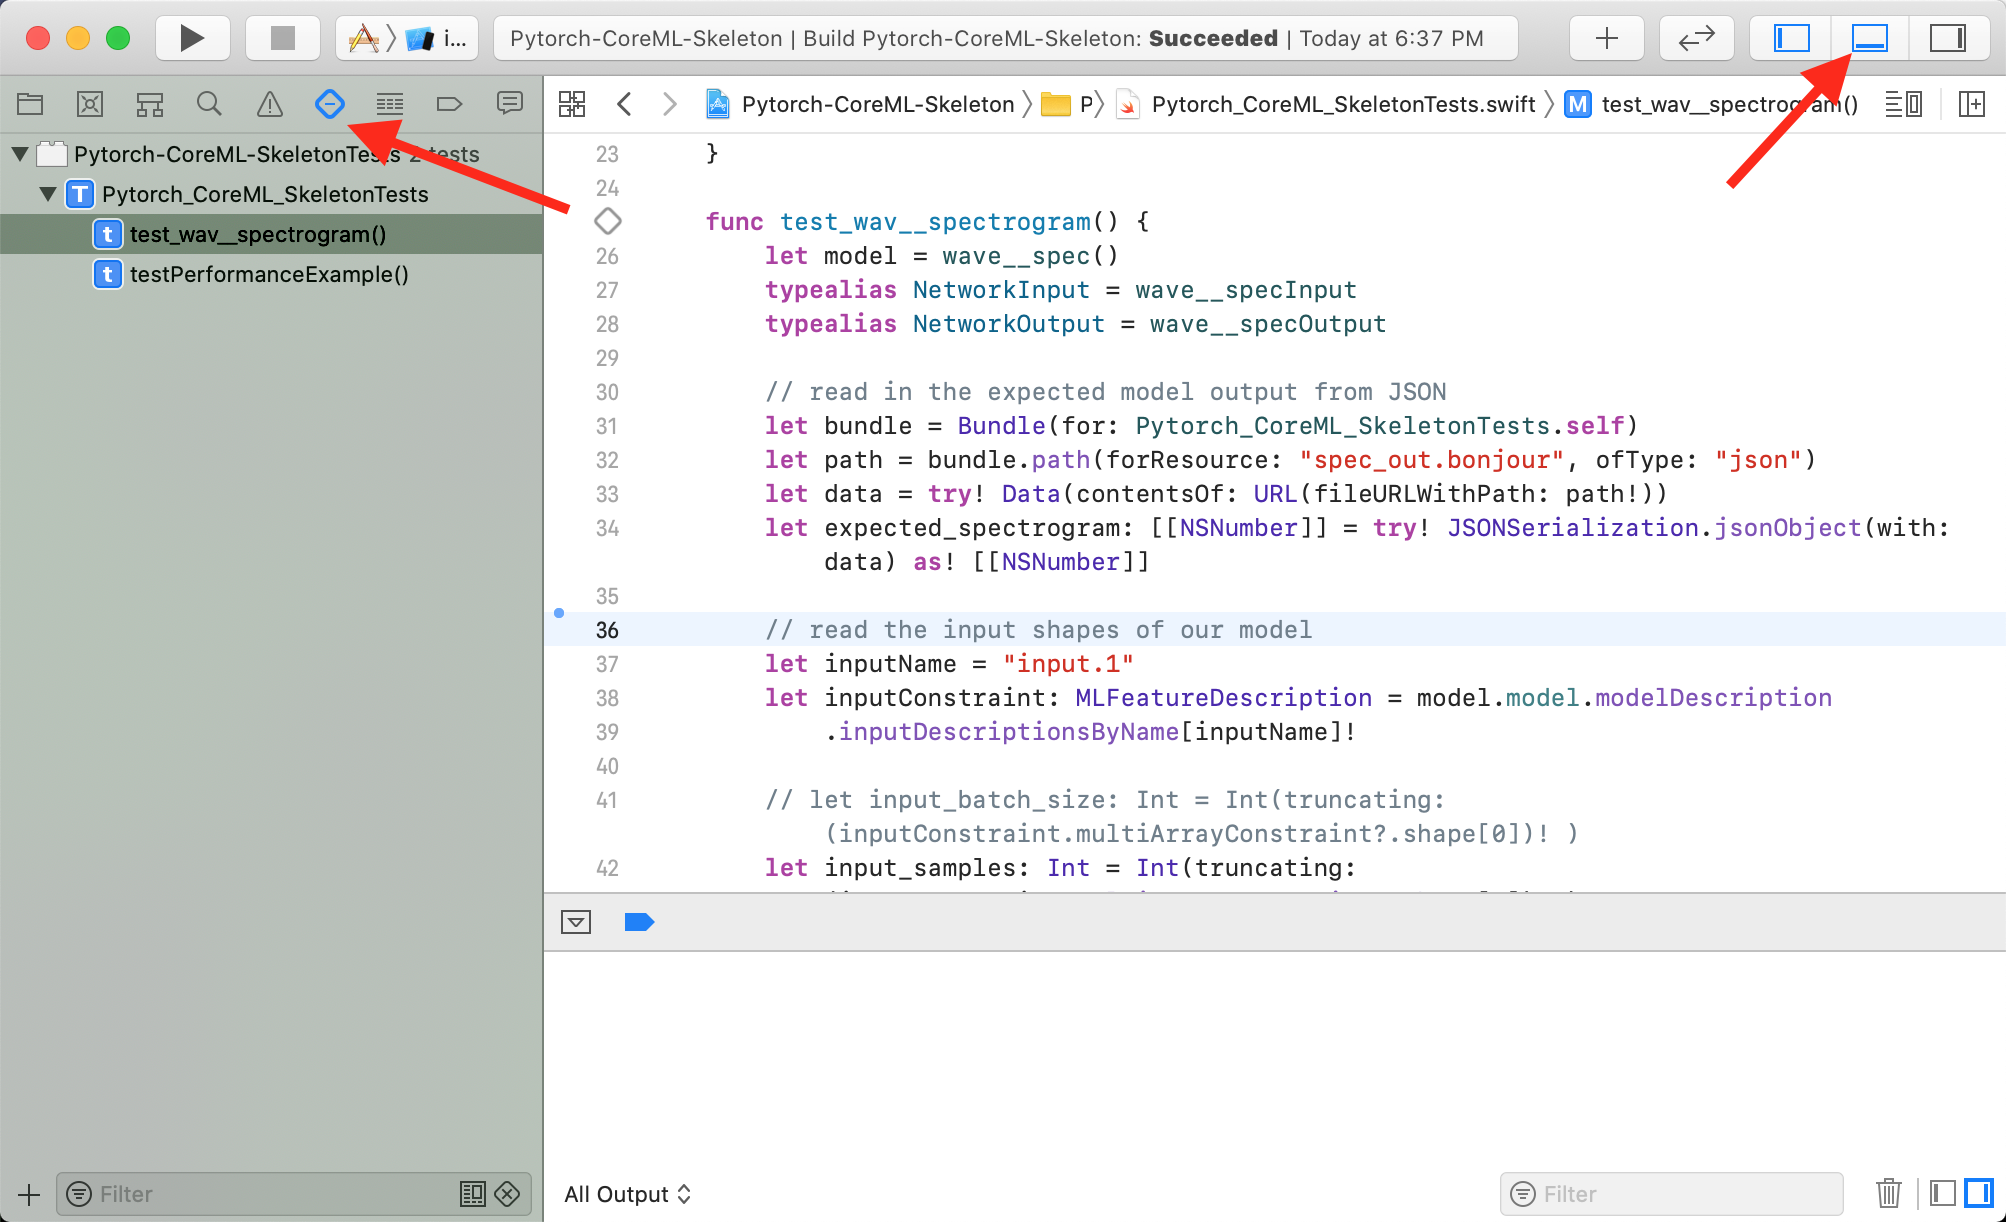
Click on the test named test_wav__spectrogram within the navigator, and
you will see the top of this function. We won’t go through this function
line-by-line, but at a high level, it does the following:
- Load the
.mlmodelfile we exported from Python - Load the JSON file of the spectrogram we expect to get out
- Load in the
bonjour.wavfile and convert it into a numpy-like array - Run a forward pass “on device”
- Compare the on device output with the spectrogram from JSON
- Uncork a bottle when the test passes! :)
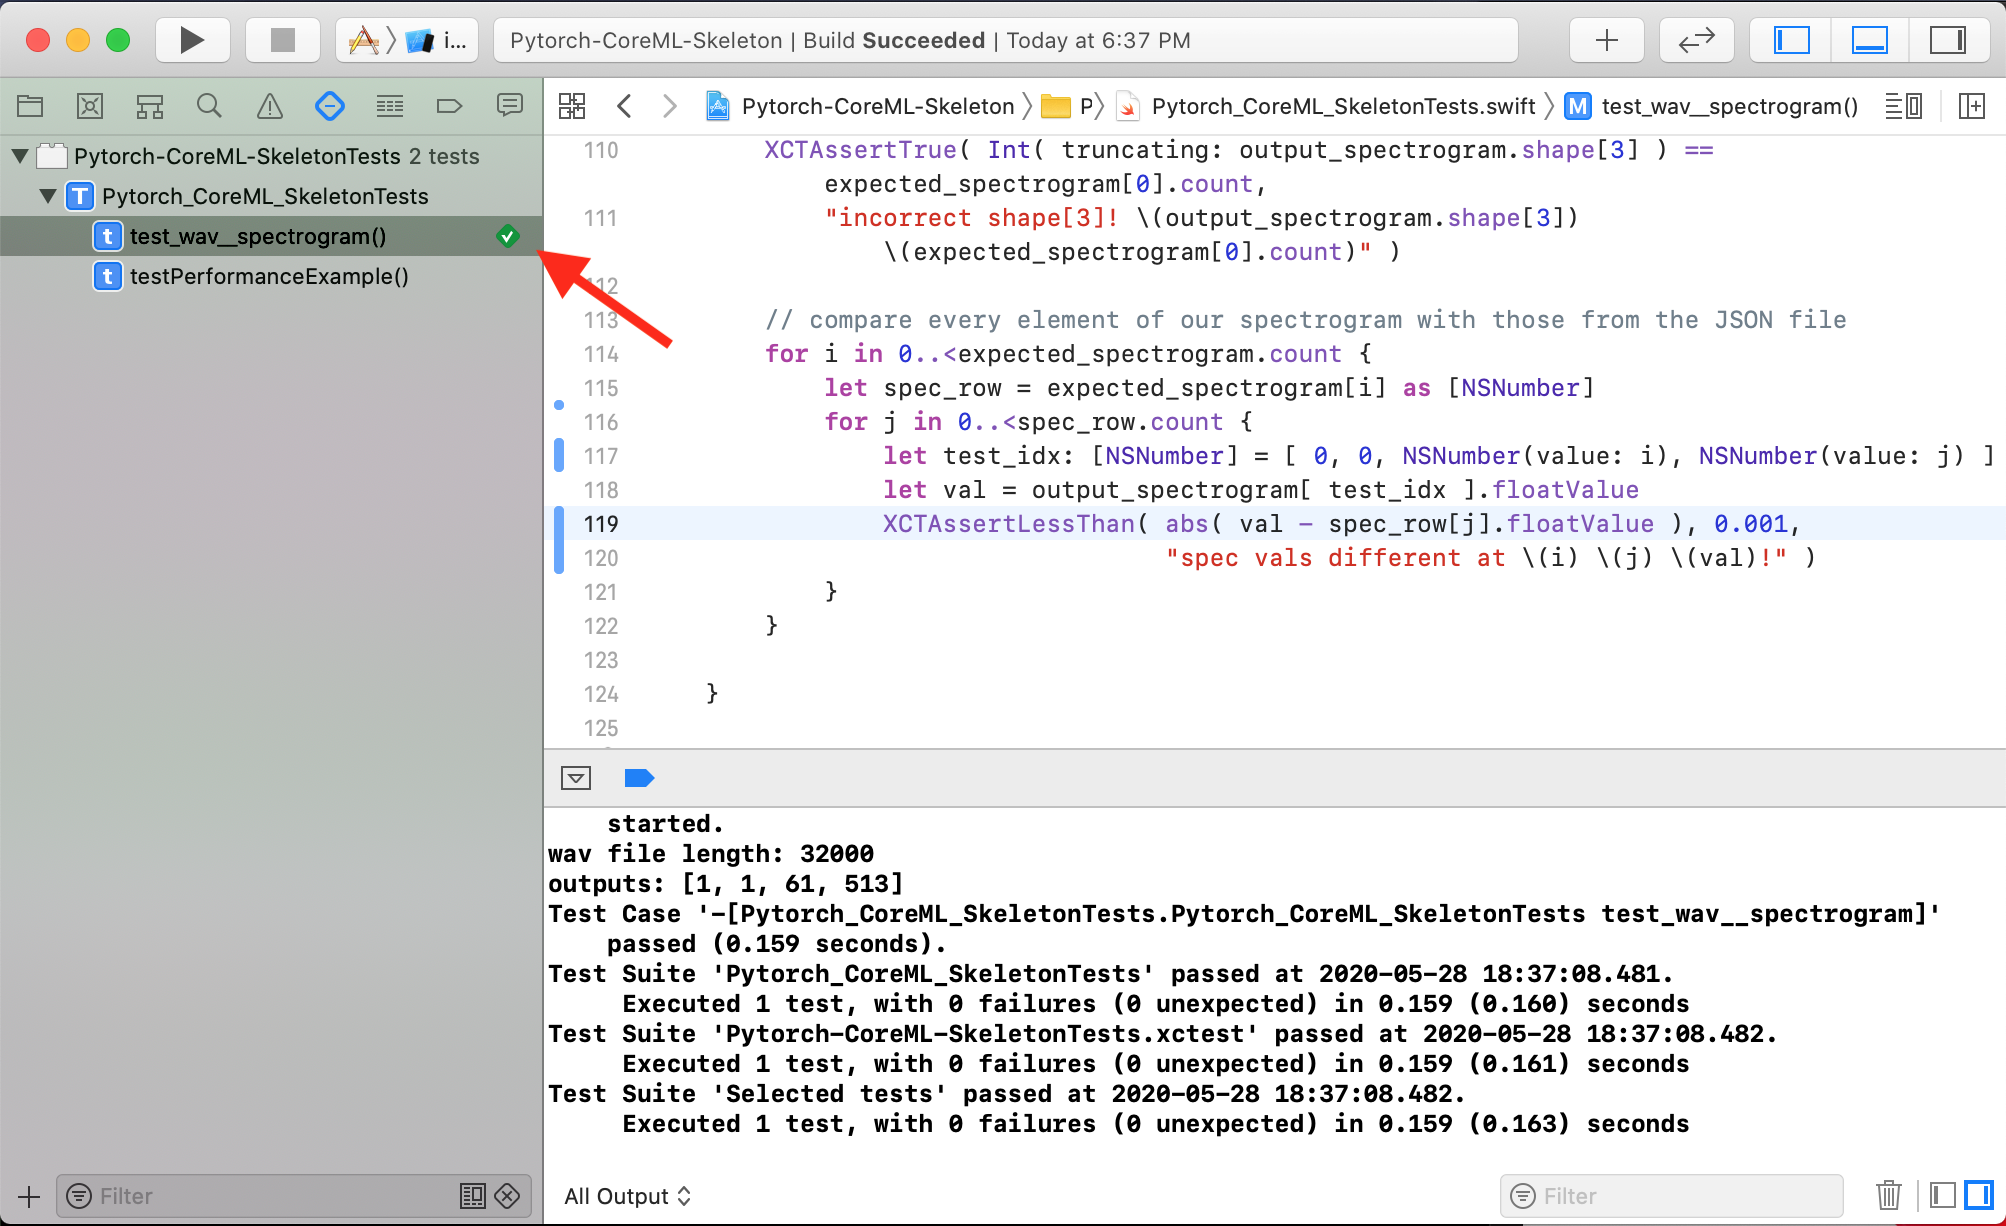
Before we get into the code, let’s run this test and see how it goes, by clicking
on the “run” icon to the right of test_wav__spectrogram in the Test navigator.
Hopefully after a short wait, you will get a big notification that says
“Test Succeeded” and the run button will turn into a green check.
You will most likely want to see the log of the test run, which can be toggled via the icon on the upper right, a rectangle with a solid bar at the bottom. Toggle it to show the Debug area below the code editor.
Step 6: Breaking Down the Unit Test
I won’t go into the fine details of this unit test, but highlight the model
prediction sections. However, I would say that at a minimum, you’d need to get
to know MLMultiArray, as that’s the fundamental interface for sending
inputs and getting outputs from Core ML models. Yes, there are other ways to
make ML requests, and use those if they suit your needs (such as via Vision and
SoundAnalysis frameworks). However, if your model’s input requirements deviate from these
interfaces, or if you want the option of on-device training, you will need to
work with MLMultiArrays.
Within our unit test, we allocate an input MLMultiArray and populate it
with the floats from the wav file:
// allocate a ML Array & populate with audio samples
let ptr = UnsafeMutableRawPointer(mutating: waveform_samples )
let array_shape = [1, 32000] // shape dictated by model's input
// crate the ML Array
let audioData = try! MLMultiArray(dataPointer: ptr,
                         shape: array_shape,
                         dataType: .float32,
                         strides: [array_shape[1], 1])
This code creates a MLMultiArray directly from the audio buffer via its pointer, instead of looping over each element. The funny exclamation and question marks you might encounter within Swift code is the language’s way for dealing with optionals. You can ignore them for this test.
To run forward pass using this input, we set up an input dictionary, similar to Core ML’s Python interface, and retrieve the results from the output dictionary, either manually or via the convenience output class that XCode created, which we do in this example:
// create the input dictionary as { 'input.1' : [<wave floats>] }
let inputs: [String: Any] = [
    "input.1": audioData,
]
// container class for ML Model inputs
let provider = try! MLDictionaryFeatureProvider(dictionary: inputs)

// Send the waveform samples into the model to generate the spectrogram
let raw_outputs = try! model.model.prediction(from: provider)

// convert raw dictionary into our model's output class
let outputs = wave__specOutput( features: raw_outputs )
// the output we're interested in is "_14"
let output_spectrogram: MLMultiArray = outputs._14
The rest of the code is comparing the individual floats from this output_spectrogram
with the values from the JSON arrays we read in, by looping through each row
and each column at a time. This make me miss (and therefore appreciate) Numpy a
great deal, but again, I digress..
Let’s recap: This unit test exercises the forward pass from end-to-end, just like how we did this validation in Python, by reading the wav file, do a forward pass using the model, and compare the outputs. I chose audio for this tutorial because of the simplicity of the inputs, with no need for any pre-processing, normalization, and post-processing that other model types may need. When they do, it will make this tested pipeline even more useful, since it will also exercise these additional steps to ensure consistency, since most likely they are implemented independently. I hope you will get as much mileage out of having set up such a pipeline as I have.
Conclusion
When you get your converted Pytorch model to pass the XCode unit test, you are in great, great shape. From this point on, you can train the Pytorch model to your heart’s content, and as long as you keep the model’s architecture largely the same, your model should behave the same way as on-device. And even when you do change the model’s architecture, this pipeline will quickly tell you whether the change will work on Core ML or not, saving you having to backtrack later. When in doubt, simply run the export script, re-import the model into XCode, and re-run the test to check. In all likelihood, the unit test will stay green. Nevertheless, it’s a great insurance policy to have.
In the next post, I’ll go over a few Core ML conversion issues and how they can be resolved, since more often than not, your model will be more complex and therefore more likely to run into issues. For now, enjoy that passing test!